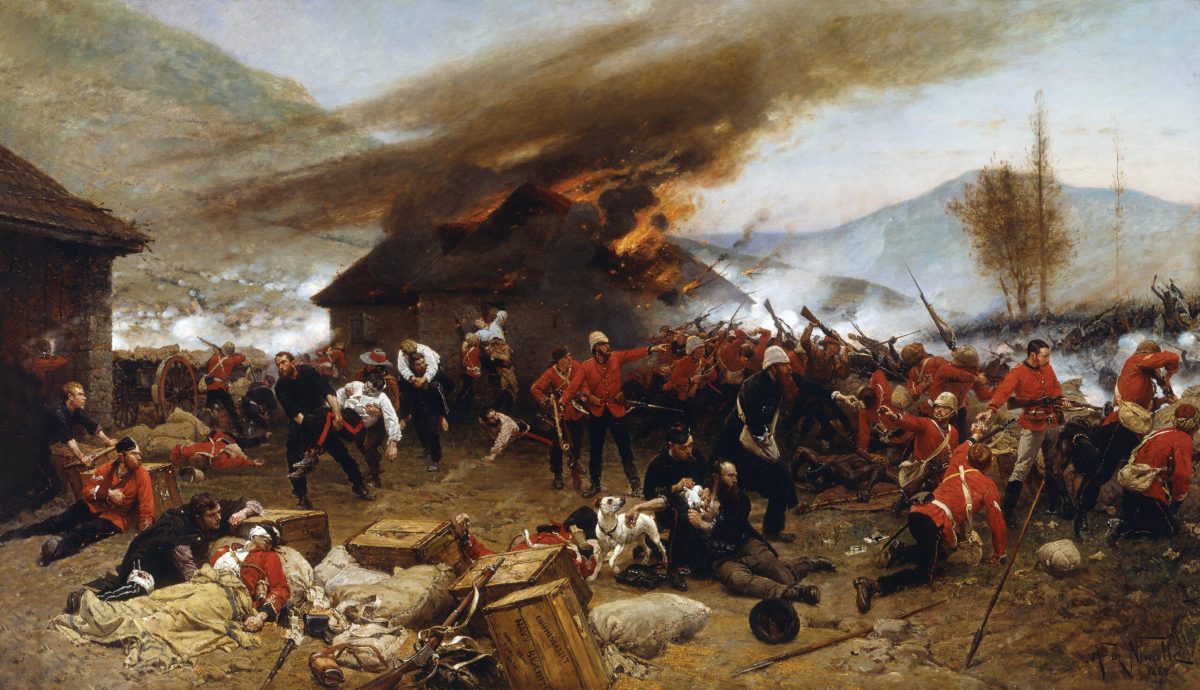
A lone Zulu warrior suddenly sprang out of nowhere and fired off a shot at the red-coated British soldiers. The warrior then ran off in a desperate scramble to escape. A furious barrage of rifle fire followed him—yet somehow, he managed to evade the bullets. Lt. John Chard, the officer commanding, remarked in admiration of the Zulu that he was “glad to say the plucky fellow got off.” It was Jan. 23, 1879, and the epic defence of Rorke’s Drift had just ended. Although a minor action in a far-off colonial war, it is one of the most famous battles in British military history.
The British and Zulu maintained friendly relations for almost 50 years before they came to blows in the Anglo-Zulu War of 1879. However, by the 1870s the fiercely independent Zulu, who possessed great military prowess, became viewed as a threat to expansionist British colonial ambitions in Southern Africa.
Greed for Diamonds
Diamonds were discovered at Kimberley in the 1860s, which became a major factor in the British desire to bring the disparate peoples of Southern Africa together under a British-led confederation. Such a confederation would allow British authorities at the Cape Colony to exert political control while also benefiting from the huge economic potential the region offered.

Recommended for you


In 1877, the British annexed the Boer South African Republic, an act which led to a contiguous border and therefore direct confrontation with the Zulu. The Boers had a long-running border dispute with neighboring Zululand. Sir Henry Bartle Frere, the British High Commissioner for Southern Africa, sought to use the dispute to force a confrontation with the Zulu and remove the threat they posed to British ambitions in the region.
In late 1878 things came to a head following a series of border incidents. In July a wife of Sihayo kaXongo, a Zulu chief, had fled to Natal, the bordering British colony, but was pursued across the border by warriors. She was captured and returned to Zululand for execution. A week later a second wife fled and was likewise executed. In September, a colonial engineer and a trader were abducted on the border by a group of Zulus. Although later released, the incident caused outrage amongst the British.
Seizing on these incidents as his casus belli for war, Frere sent Cetshwayo kaMpande, the King of the Zulus, a series of blatantly unacceptable demands. On Jan. 10, 1879, the ultimatum expired with no reply from Cetshwayo. The following day, British forces crossed into Zululand, and the Anglo-Zulu War began. British forces invading Zululand were commanded by Maj. Gen. Frederic Thesiger, Lord Chelmsford. Three columns of troops were to cross into Zulu territory at different points before converging on Ulundi, the Zulu capital. The northern column advanced from the Transvaal, the southern from Natal, while the central column crossed into Zululand via Rorke’s Drift. The central column would be the main attacking force, accompanied by Chelmsford. The first action of the war came on Jan. 12, when Chelmsford attacked Sihayo’s kraal. Most of the warriors were away at Ulundi and the short fight ended in British victory. Due to heavy rain, which had swollen the Buffalo River border and turned tracks into mud, the advance of the center column was slow.
Disaster at Isandlwana
Nevertheless, the column arrived at a place called iSandlwana on Jan 20. The troops made camp, but since they did not expect to be there long, conducted little defensive work. On Jan. 21, Chelmsford sent out troops to reconnoiter to the south. This force encountered several hundred Zulus. A messenger was dispatched to report back to Chelmsford. The British commander acted fast, moving out of iSandlwana with half his men. Since he could not get the entire force moving quickly enough, he left the remaining half of his force behind at iSandlwana under the command of brevet Lt. Col. Henry Pulleine to guard the camp and the baggage.
While Chelmsford was away, 20,000 Zulus under the command of Ntshingwayo kaMahole attacked iSandlwana on Jan. 22. Using their traditional “horns of the bull” tactic, the Zulus overran the position. Only a handful of survivors managed to escape. The Battle of iSandlwana was a disaster for the British, who suffered over 1,300 killed. Worse still, the day’s fighting was far from over. A large party of Zulus, about 3,000-4,000, broke off and headed across the border to attack the small British depot at Rorke’s Drift.

Meanwhile, life at Rorke’s Drift had been uneventful. The post was garrisoned by B Company, 2nd Battalion 24th Regiment of Foot, commanded by Lt. Gonville Bromhead, and a company of the 2nd Battalion, 3rd Regiment, Natal Native Contingent, under Capt. William Stevenson. Also present was a detachment of six sappers of No.5 Company, Royal Engineers under Lt. John Chard, who had been working the ponts on the river. Other officers included Assistant Commissary Walter Dunne, who was responsible for supplies, and Surgeon James Reynolds of the Army Medical Department. Overall command fell to Maj. Henry Spalding.
On the morning of the disaster, Chard had been at iSandlwana. Following his arrival, he was told to go back to Rorke’s Drift but to leave his men behind. Just before he set off, Chard heard reports that Zulus had been detected near the camp. When he arrived back at Rorke’s Drift, he expressed concerns to Spalding about the potential for a “dash at the ponts.” Spalding was expecting another company of the 24th as reinforcements, but they were overdue. He decided to ride to Helpmekaar to find out where they were. Before he left, Spalding asked Chard, “Which of you is senior, you or Bromhead?” Chard did not know, so Spalding checked his Army Lists. It was Chard. Spalding then left with the immortal words: “Nothing will happen and I will be back again this evening.”
At noon, distant shots coming from iSandlwana were heard. Reynolds, Otto Witt (the missionary at the drift) and George Smith (the local padre) climbed the nearby Shiyane Hill to see if they could view anything of the distant battle. After a while, the men realised something was wrong. It became apparent that a large force of Zulus was advancing on Rorke’s Drift. They scrambled back down the hill to inform Chard.
Chard had already become aware of the defeat at iSandlwana when Lt. Gert Adendorff of the NNC arrived sometime after 3:00p.m. and told him the news. Other exhausted survivors rode past Rorke’s Drift heading for Helpmekaar, confirming the defeat.
A Drastic Choice
With an attack on Rorke’s Drift seemingly certain, Chard and Bromhead were hit with a stark choice: retire back to Helpmekaar or stay and defend the depot. An issue complicating matters was the fact that there were 30 patients in the hospital at Rorke’s Drift, who would be difficult to move and thus slow to evacuate. As the two discussed their options, Acting Assistant Commissariat James Langley Dalton voiced his preference to stay, pointing out the Zulus would likely overtake them on the road to Helpmekaar. The fateful decision was made to stand and fight.
Orders were given to utilize wagons, mealie bags, and biscuit boxes to fortify the post and link the buildings with barricades. Rorke’s Drift itself consisted of two thatched buildings, one used as a storeroom, the other as a makeshift hospital. Set back from the former was a well-built stone cattle kraal and set further back still was a larger rough stone kraal. There was also a stone cook house, but it was isolated some distance south of the hospital and was not incorporated into the defenses.
Forming the backbone of the garrison, B Company mustered 95 men fit for duty, all armed with the .450 Martini-Henry Rifle. NNC troop numbers are uncertain, but most were armed with shields and spears, only a handful possessing firearms. Thirty sick were in the hospital, although many were able to bear arms. All told, around 400 men were available to build the defenses.

At 4:00 p.m., a group of mounted men of the Natal Native Horse arrived from iSandlwana. Chard deployed them as a screen beyond the Shiyane to slow the Zulu advance. A short while later, shots rang out and the horsemen streamed past the depot, riding away for their lives. As they did so, a civilian shouted a warning that the Zulus had arrived. This sudden flight unnerved Stevenson’s NNC company of native African soldiers, who suddenly threw down their weapons and ran.
The garrison was now down to only 150 men. A lookout on the roof of the hospital shouted that he could see the Zulus. Rev. Witt now decided it was time for him to depart for Helpmekaar. (It should be noted that more recently it has been claimed Witt had in fact left Rorke’s drift some days earlier.) A soldier on one of the walls was then heard to shout, “Here they come, lads!”
The senior Zulu commander during the battle was Prince Dabulamanzi kaMpande, brother of Cetshwayo. Noted for being headstrong, he made the decision to attack Rorke’s Drift. Other Zulu commanders included Prince Hamu kaNzibe, half-brother to Cetshwayo, and Mnyamana Buthelezi, a senior adviser to the king. In all, the Zulu force attacking Rorke’s Drift numbered an estimated 3,000 to 4,000 warriors.
At 4:30 p.m., around 500 to 600 of the iNdluyengwe (Zulu regiment) made the first rush on the post. When within 500 yards, Chard gave the order to fire. As the heavy bullets of the Martini-Henrys hit their targets, Zulus could be seen springing backwards or into the air. One witness, Reynolds, later recalled that despite the losses, “the great host came steadily on.” The Zulus pressed their attack.
Garrison under siege
When the Zulu attack became checked within 50 yards of the rear (south side) of the post. the iNdluyengwe then veered to their left, moving around the west end of the hospital to the front (north side) of the post. Again, they attacked, and fierce hand-to-hand combat took place. Bromhead, accompanied by Color-Sergeant Frank Bourne, the 24-year-old senior NCO of B Company, drove off the initial assault with a bayonet charge. No sooner had the initial attack been driven off, then the main Zulu assault began, including warriors of the uThulwana, iNdlondlo, and uDluko. Leading were two men on horseback. One was Dabulamanzi, the other, who remains unknown, was shot dead. The Zulus renewed their attack on the hospital’s veranda with much ferocity. However, they were met by devastating firepower.
Meanwhile, Zulu warriors armed with rifles took up positions along the Shiyane terrace. Some of them were believed to be carrying Martini-Henrys most likely captured from their fallen foes at iSandlwana, but this is still debated. Positioned on the terrace, the Zulu force fired into the post from amongst the cover of broken rocks and boulders. The British sustained several casualties to Zulu fire, including Corporals John Lyons and William Allen. Another hit was Dalton. An hour into the battle, the defenders on the veranda were driven back to a hastily constructed dogleg shaped barricade.

The Zulus then made a determined effort to overrun the barricades directly in front of the storehouse. Chard and Bromhead, with about half a dozen men, rushed forward to meet the assault and drove the attackers back. Nevertheless, Chard was greatly worried about the mounting British casualties. At 6:00 p.m., he gave the order to withdraw from the yard and fall back behind a barricade of biscuit boxes built from the front-left corner of the storehouse to the barricade at the front. This effectively cut the post in half and reduced the area required to be defended.
Their strategic withdrawal left the hospital dangerously isolated. Much of what happened during the hospital fight is uncertain. The building was defended by six able-bodied soldiers and around 20 patients able to bear arms, firing through windows and loopholes. Sometime after 6:20 p.m., the Zulus forced their way into the hospital via a door on the western side. It was here that Pvt. Joseph Williams is said to have felled 14 Zulus before he was overwhelmed. The Zulus also gained entry via doors to the front of the building. The hospital’s thatched roof suddenly began to burn, either set alight by the Zulus or possibly from a paraffin lamp inside the building. The rooms quickly filled with thick dirty smoke.
Escaping the Hospital
Pvt. Henry Hook, who described the British defenders in the hospital being “like rats in a trap,” had been in a room with a wounded man of the NNC. As the room became smoky, he was forced to move into an adjacent room, but was unable to take the patient with him, who was subsequently killed by the Zulus. Hook then found himself with two other patients desperately fending for their lives. Hook recalled: “The Zulus beat the door in, and tried to enter. I stood at the side and shot and bayoneted several … They threw assegais [short-handled spears, the traditional Zulu main weapon] continually, but only one touched me, and that afflicted a scalp wound … One Zulu seized my rifle and tried to drag it away. Whilst we were tussling I slipped a cartridge in and pulled the trigger—the muzzle was against his breast, and he fell dead.” Pvt. John Williams had been in another room when he dug a hole through the wall to emerge into the same room as Hook.
The men then hacked a hole through another wall, and climbed through it into yet another room. Then they started hacking a hole through the next wall to escape. Hook and his fellow defenders eventually made their way to the eastern part of the hospital. The people trying to escape the hospital were faced with the perilous task of crossing the abandoned yard to reunite with their fellow British soldiers taking refuge behind the wall of biscuit boxes.
Fortunately for the escapees, darkness had fallen. The defenders passed the patients out through a window, then dashed across the yard. Trooper Hunter of the Natal Mounted Police was unable to make it, being speared by a Zulu. Another killed was Sgt. Robert Maxfield, who was delirious on his hospital bed and struggled violently when his fellow soldiers tried to carry him to safety. Despite his comrades’ best efforts to save him, it proved impossible to rescue Maxfield and the Zulus killed the sergeant. Other defenders managed to get out and miraculously survived the night outside the perimeter.

The Zulus also attacked the storehouse and the front barricade. The angle between the front barricade and the line of biscuit boxes proved a vulnerable point in the British defenses, as the area was particularly exposed to Zulu fire from the hill. The Zulus were also able to approach using a rocky ledge as cover. Bromhead was with six men in this area. The location proved so perilous that only he and one man escaped being wounded. Cpl. Ferdinand Schiess of the NNC (who was Swiss) was hit in the foot. Nevertheless, the NCO was later seen bayonetting several Zulus and shooting another.
Of the repeated Zulu attacks, Chard wrote: “A rapid rattle of fire from our rifles, stabs with the bayonet, and in a few moments the Zulus were driven back … A brief interval and the attack would be again made, and repulsed in the same manner. Over and over again this happened, our men behaving with the greatest coolness and gallantry.” Pvt. Frederick Hitch suffered a bullet to his shoulder. As he fell backwards, a Zulu warrior moved to finish him off, but Bromhead promptly saved his soldier by using his revolver. Despite his wound, Hitch went back to defend the post using Bromhead’s revolver before handing out ammunition to his comrades. Hitch would eventually pass out unconscious due to loss of blood, only regaining awareness after the battle was over.
Near Victory
The Zulus attempted but failed to set the roof of the storehouse alight. As the fighting continued, Dunne offered to build a high redoubt using mealie bags piled in front of the building. As bullets sailed around him, Dunne dragged the bags into place until the redoubt took shape. The defenders intended to place the wounded inside for safety, while a handful of marksmen would fire over the top and over the heads of their comrades below.
The Zulu warriors traditionally avoided fighting at night. However, with victory seemingly imminent, they continued their attacks after darkness fell. The fire engulfing the hospital illuminated much of the battlefield, allowing the British visibility to continue accurately aiming and firing their rifles. Suffering heavy casualties, the Zulus began withdrawing back to the relative safety of the darkness.
However, the resourceful Zulu warriors refocused their attack on the well-built kraal, which was not well-illuminated. This skilful attack forced the British back from the kraal, and they eventually were compelled to abandon it. Nevertheless, this did little to aid the Zulu assault, since the British riflemen manning the redoubt were able to direct their fire down and onto the kraal. The fighting began to slacken. The final Zulu charge occurred between 9:00 p.m. and 10:00 p.m. and was repelled. The Zulus continued firing into the post until sometime after midnight, with the last shots ringing out around 4:00 a.m.
At daybreak, the devastation became apparent. The hospital had fallen in and the horrific smell of burnt flesh hung over the post. The detritus of battle was strewn everywhere, including spent cartridge cases, spears, and shields. The worst sight was the Zulu corpses piled around the barricades. The garrison understood the Zulus had withdrawn but the men were put to work rebuilding barricades in readiness for their return. At 7:00 a.m., Zulus were spotted coming from behind the Shiyane. Chard readied his men for a renewed assault, but this did not occur.

Colour-Sgt. Bourne authorised the issue of rum to the men. One soldier in line for a stiff drink was Hook—who until that point had been a well-known teetotaller. Nevertheless, he was heard to say, “I feel I want something after all that!” A bottle of beer was also found, which Chard and Bromhead shared. At 8:00 a.m. the vanguard of the long-awaited relief column led by Chelmsford arrived. British casualties stood at 15 dead and 10 wounded, two of which subsequently died of wounds. Zulu losses are uncertain, with estimates running from 400 to 600 killed and more wounded. Chard reported his men buried 351 Zulu corpses. Eleven Victoria Crosses were awarded for the battle, including Chard, Bromhead, Hitch, Hook, Reynolds, Dalton and Schiess, as well as four Distinguished Service Medals.
Prelude to More Wars
The British victory at Rorke’s Drift, although justifiably inspiring, couldn’t erase the shock the Zulus had inflicted with the disastrous iSandlwana debacle—London promptly dispatched reinforcements and appointed Lt. Gen. Sir Garnet Wolseley to oversee Chelmsford. The latter’s second invasion of Zululand—bolstered by fresh troops, artillery and Gatling Guns—destroyed Cetshwayo’s army at the July 4, 1879 Battle of Ulundi, avenging Britain’s humiliating iSandlwana defeat and winning the Anglo-Zulu War.
With the Zulus’ defeat, Britain’s only remaining obstacle in exerting total control over all of the vast territory and rich resources of South Africa were the region’s original European colonists—the Boer republics. Conquering the stubbornly independent-minded Boers, however, mimicked Britain’s struggle to overcome Cetshwayo’s Zulus in that the doughty Boers defeated Britain in the First Boer War (1880-1881), but Boer resistance to Britain’s blatant land-grab was finally crushed by Britain winning the Second Boer War (1899-1902).
The history of the 1879 Anglo-Zulu War has drawn more attention in recent years. In January 2023, thousands of Zulu men and British reenactors gathered to commemorate the Zulu victory at Isandlwana which preceded the Battle at Rorke’s Drift. This was followed by a public exhibition hosted by the Royal Philatelic Society of London in July 2023, at which more than 500 artifacts were shown to provide the context for the conflict between the British empire and the Zulu Kingdom, including artifacts from Rorke’s Drift and the shields of Zulu warriors. Referring to the British troops as “valiant soldiers,” Prince Mangosuthu Buthelezi, the Traditional Prime Minister to the Zulu Monarch and Nation, encouraged people to see the exhibition and described the conflict as “undeniably a monumental collision of empires, as the nation forged by King Shaka kaSenzangakhona proved far more formidable than anyone in British society or the military had ever anticipated.”

this article first appeared in military history quarterly
![]()
![]()