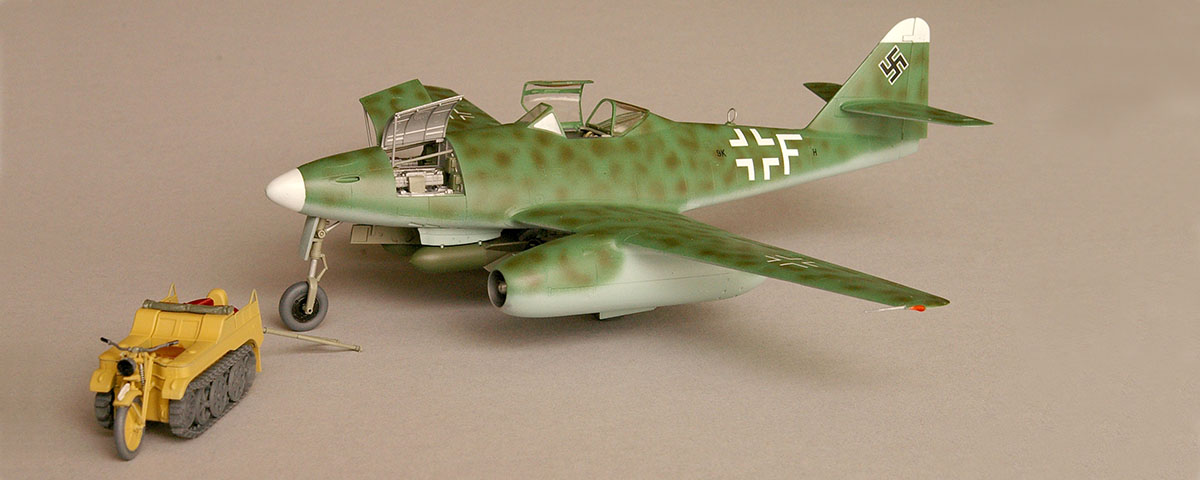
Tamiya’s 1/48th-scale Messerschmitt Me-262A-2a fighter-bomber is the “Mercedes-Benz” kit of WWII’s first operational combat jet. Not only is it extremely detailed, it comes with its own tow tractor and ground crew.
Construction starts with painting and assembling more than a dozen pieces that form the cockpit. The kit instructions call for the jet’s front office to be painted “German gray,” but experience has shown that painting a cockpit very dark gray or black causes the details to disappear into a bottomless pit. Instead I mixed a little Grau, RLM-02, into the dark gray to lighten the almost black shade. Along with dry brushing it with RLM-02, that helped high- light the cockpit details.
Next construct the dual 30mm Rheinmetall-Borsig MK 108 cannon bay that fits in the aircraft’s nose. Paint this area various shades of aluminum, steel and dark green. Note that the bay, another very detailed part of the model, can be displayed open. (The fighter version of the Me-262 was armed with four 30mm cannons.)
No need to worry about this model standing on its tricycle landing gear, since the floor of the gun bay is cast in white metal. The casting also serves as the tricycle gear well. After painting the nose gear retraction strut and the gear leg RLM-02, slip it into position and attach it to the metal floor with cyanoacrylate cement.
Assemble the wings and attach them to the fuselage along with the horizontal stabilizers. The rudder is a separate part, so you can pose it offset if you choose.
Paint the intake portions of the dual Junkers Jumo 004 axial-flow jet engines aluminum and the exhaust nozzles “burnt iron.” Next assemble the 10 pieces that make up each of the engines. When painting is complete, dust the tail pipes with Tamiya’s “smoke” to add realism.
Attach the engines to the wings and the racks for the two 250-kilogram bombs to the underside of the fuselage’s forward section. After masking off the cannon bay, cockpit and landing gear wells, spray on a coat of primer to reveal areas that need filling and sanding.
The fighter-bomber version appeared in many camouflage patterns; checking references is important when it comes to choosing a color scheme. The undersides of most were painted light blue, Hellblau, RLM-76. There are three schemes for the topside provided in the kit, but I chose to paint mine in the colors of a 262 assigned to Kampfgeschwader 51 in the summer of 1944. The aircraft’s topside is overall Hellgrün, RLM-83, with irregular splotches of Dunkelgrün, RLM-71. Check out a drawing of his aircraft on P. 233 of Warplanes of the Luftwaffe, edited by David Donald.

The wing and fuselage Balkenkreuz national markings come with the kit, while I took the white “Fs” on the fuselage sides from SuperScale sheet No. 48-994. The white swastikas are from Third Group sheet No. 48-038, and the small black “9K” and “H” came from my spares box. You can simplify painting the canopy and windscreen by applying E-Z Mask, No. 219, precut vinyl pieces that fit over the clear parts.
Paint the tow tractor’s tracks dark metallic gray, adding a dry brushing of silver to show wear. Assemble the vehicle’s body, then paint it “light sand,” with “leather” cushions. Once you’ve painted the tow bar RLM-02, you can hook up the tractor to the aircraft. Adding the three optional crewmen provides a realistic touch.
Read more about the Me-262 in Harbinger of a New Era, from the July 2010 issue of Aviation History. Subscribe here!