Grumman F9F Panther kits are easy to find in most hobby stores and modeler’s swap meets. To build an accurate 1/48th-scale version of an F9F-2 flown by Ensign Neil Armstrong, you’ll need Trumpeter’s kit No. 02832. For modelers who prefer smaller-scale replicas, there are several 1/72nd-scale kits available, too.
Most Panther cockpits were painted interior green (FS-34151), with flat black (FS-37031) side consoles, and toggle switches in silver. This kit includes an etched-brass instrument panel with a printed film sheet of instruments. Paint the panel black and brush the reverse side of the film with white. When the pieces are dry, glue the printed sheet to the back of the brass panel, creating a very convincing instrument cluster.
Spray the ejection seat frame flat black, with olive drab (FS-34087) seat cushions. The kit includes no seat harness, but it’s easy to make belts from thin paper strips dipped in black coffee.
Cement the completed cockpit to the top of the nose landing gear bay. The bay’s interior should be painted gloss white (FS-17875). Then glue this assembly into the forward section of one side of the fuselage. This is a guaranteed “tail sitter,” so epoxy a ¼-ounce lead fishing sinker behind the rear cockpit bulkhead armor plate. Paint the jet pipe burned metal and the arrester hook gloss white. Trap and glue the cockpit, nose gear well, jet pipe and arrester hook into place, then cement the fuselage sides together.
Parts A6 and A7 finish the nose of the aircraft except for the gun section. To ensure that the Panther will sit on its tricycle landing gear, I glued another ¼-ounce sinker into the nose. Paint the four 20mm cannons flat black and set them aside; later you’ll fit them into the gun nose section.
Paint the engine intake interiors white and cement them into the lower wing portion of the fuselage. Follow the instructions closely to ensure the intakes are properly placed. When this assembly is dry, glue the upper wing fillets into place. At this point you’ll have to decide if you want to display your model with the wings extended or folded. Note that parts are provided for both configurations.
To arm your Panther, be sure to drill out the holes in the bottom wing section to accept the mounting racks for the bombs or air-to-ground rockets. Glue the wing top and bottom portions together, and if you decided to display extended wings, cement them to the fuselage now. I recommend that you wait to attach the folded wings.
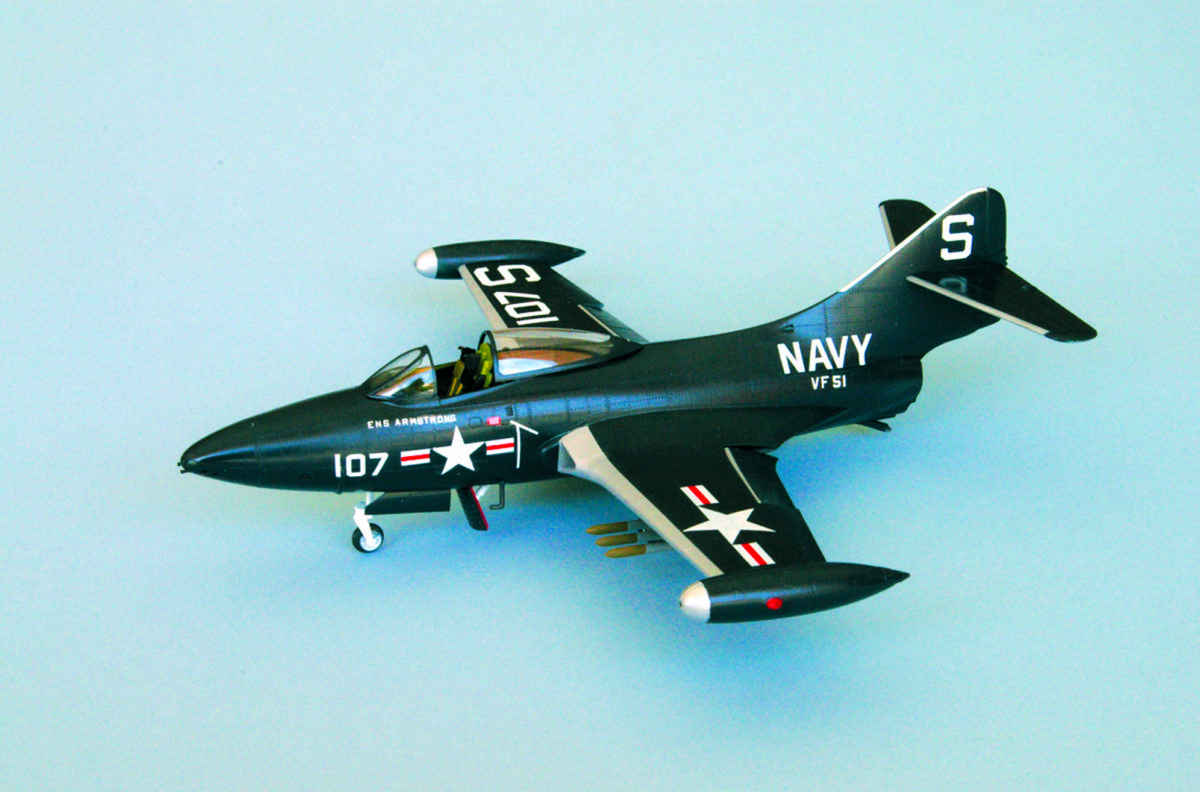
Once you add the horizontal stabilizers to the tail, you’ve finished the basic construction. Check over your work and fill and sand any flaws or seams. Virtually all Panthers that served in the Korean War wore a coat of gloss dark sea blue (FS-15042), with white squadron and aircraft numbers. Finish the painting by masking the wing leading edges and the tips of wing tanks and spraying them with Floquil platinum mist.
The gloss sea blue coat will provide a smooth surface for the markings of a Panther Armstrong flew while with VF-51, S-107. I used the national insignia and “Navy” from the kit, with the rest of the markings from Super Scale decal sheets 48-994, 48-995, 48-1002 and 72-229. Armstrong himself sponsored the construction of a model in these markings, now on display in the Washington Navy Yard’s Cold War Gallery.
Paint the tires flat black and the wheel hubs gloss white. Once you attach the landing gear doors and mask and paint the canopy frames, Armstrong’s Panther is complete.