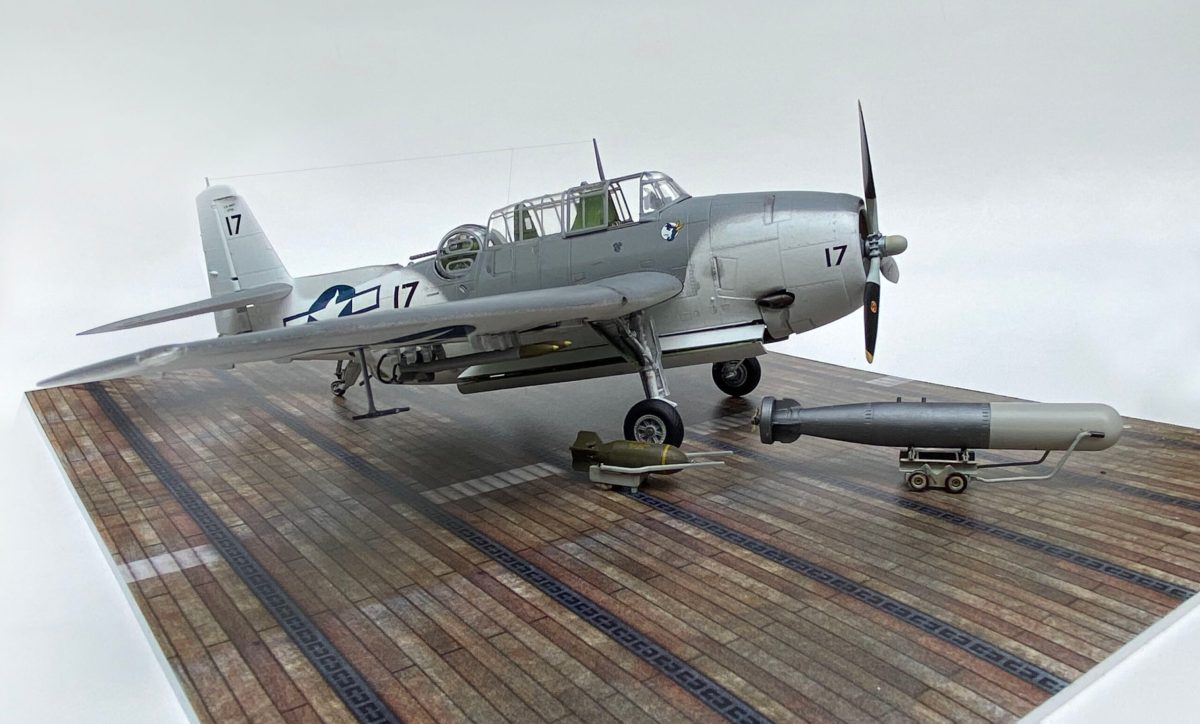
Academy re-released the 1996 Accurate Miniatures TBF-1C Avenger in 2013. With a lot of detail and good fit, it was well received by modelers looking for a 1/48th-scale replica of the famed Grumman torpedo bomber.
This Avenger comes with a choice of weapons: the standard Mk. 13 torpedo, 500-pound general purpose bombs and Mk. 54 depth charges. Our model will depict a U-boat hunting airplane from composite squadron VC-55 on USS Block Island during the Battle of the Atlantic.
Following the instructions, start with the cockpit, painting it an interior chromate green (FS 34151). There is plenty of detail from the cockpit through to the bombardier’s station and the rear gunner’s turret. Paint consoles and electronic boxes black, with white dials and switches. Add seatbelts and a harness to the pilot’s seat and to the small bench for the bombardier located in the cramped lower compartment, just aft of the bomb bay. The bomb bay itself is part of the entire assembly that runs the length of one of the fuselage sides. Finally, after all that detailing, painting and assembly, bring the fuselage halves together and set aside the completed fuselage.

The wing halves, rudder and horizontal stabilizers are a much simpler part of the build. Cement the parts together and set aside.
Next, it’s time to build the Avenger’s gun turret. Do your research. This part of the model is not for the novice. The turret, with its .50-caliber machine gun, is a complicated little model in itself, comprising 10 separate parts. Putting it all together requires extra patience. Take your time and dry-fit pieces often before final assembly.
Paint most of the pieces interior green. The machine gun should be a steel color with the ammunition chute aluminum. A brown leather armrest on the gunner’s seat and a set of seatbelts add to the detail that’s already there. After the interior is finished, put together the two clear parts of the turret with white glue or a cement designed for clear plastic. Set it all aside to dry thoroughly.
The kit comes with a set of adhesive masks cut to the size of each pane of glass on the Avenger’s large greenhouse cockpit canopy. Gently peel off the mask bits and position them in the spots indicated in the instructions. For the turret, carefully stuff the interior of the completed ball shape with a small wad of paper towel and paint the piece dark gull gray (FS 36231).
Mask off the cockpit and bomb bay to prepare for painting. This model depicts one of the Avengers involved in the hunt across the Atlantic for U-boats, providing much-needed air support for the hundreds of convoys bringing men and materiel to war-torn Europe.
Based aboard small, fast escort carriers, these aircraft were painted dark gull gray on the upper surfaces and white underneath, with the white extending up along the sides of the fuselage. The pattern is an interesting departure from the variety of blue schemes seen in the Pacific theater. Mask and paint the fuselage and then attach the wings and horizontal stabilizers, painting along the way. Give the model a coat of clear gloss to get ready for markings.
Markings and insignia are simple: national insignia, a squadron number and a small squadron insignia. There are plenty of small data stencils that take a lot of patience to apply. The stencils create interest and along with some light weathering add a little authenticity. Use setting solution so that those decals snuggle down into the recessed panel lines.

While the aircraft dries, assemble the tires and landing gear. Struts are painted white, including the landing gear bays. Paint the propeller black with a silver hub, yellow tips and white or pale gray “cuffs” at the base of each propeller blade.
Next, assemble the Avenger’s weapons. A standard load for aircraft hunting U-boats was two Mk. 45 aerial mines and a pair of 500-pound bombs. Paint the bombs olive drab; the mines can be painted the same color or a light gray. Don’t forget the decals of the data stencils, giving the bombs an accurate look.
Cement the bombs into the bomb bay, with the two aerial mines forward and the two general purpose bombs to the rear. The bomb bay doors come as two pieces but will need to be split to pose them in an open position. Use a razor saw to cut the doors apart and attach the four pieces to the door struts.
Attach the landing gear and gear doors, making sure the airplane sits correctly, and give the model a coat of flat varnish to seal the decals.
Very carefully place the gunner’s turret into its position. The fit is extremely tight so take special care in adding the completed turret. Next, add the rest of the canopy using a cement designed for clear plastic. Be sure to pose the cockpit open to show off all that detail and hard work. Last, attach the “tiny bits”—the distinct upward-canted pitot tube, clear pieces for the red and green formation lights, the delicate surface-radar antenna beneath each wing and, finally, this TBF-1C Avenger is ready to head out to hunt U-boats or just start a conversation on the display shelf.
Read more about the Avenger in Tough Turkey: Why Grumman’s TBF Avenger Was the Ultimate Torpedo Bomber from the September 2021 issue of Aviation History. Subscribe today!