Phantom “phans” can be a picky bunch when it comes to the myriad nuances among the many versions and upgrades that the McDonnell F-4 Phantom II underwent following its first flight in 1958. Hasegawa’s range of F-4 kits makes even the most detail-oriented modeler happy. First released in the 1980s, its line of Phantoms have remained among the best kits of the type in 1/48th scale. Hasegawa’s F-4B can be built into a fine replica OOB (out of the box), but the popularity of the F-4 means there are plenty of aftermarket detail kits to add to the build.
detailing “the office”
Begin with the cockpit. The kit has nice raised detail for the modeler with a keen eye and a steady hand. There are also two five-piece ejection seats and two detailed pilot figures. For this Phantom, a pair of resin Martin-Baker ejection seats from True Details and an interior metal set from the Czech company Eduard will add detail. Pay particular attention to the rear seat. In the U.S. Navy, the cockpit for the RIO (radar intercept officer) doesn’t have flight controls, so the control stick and throttle aren’t there. Find some quiet time for clipping, bending and cementing all the metal details in place.
While the cockpit tub is drying, it’s time to tackle some of the smaller subassemblies. Put together the landing gear, paint the hydraulic struts for the speed brakes and assemble the centerline external fuel tank. It’s also a good time to tackle the weapons.
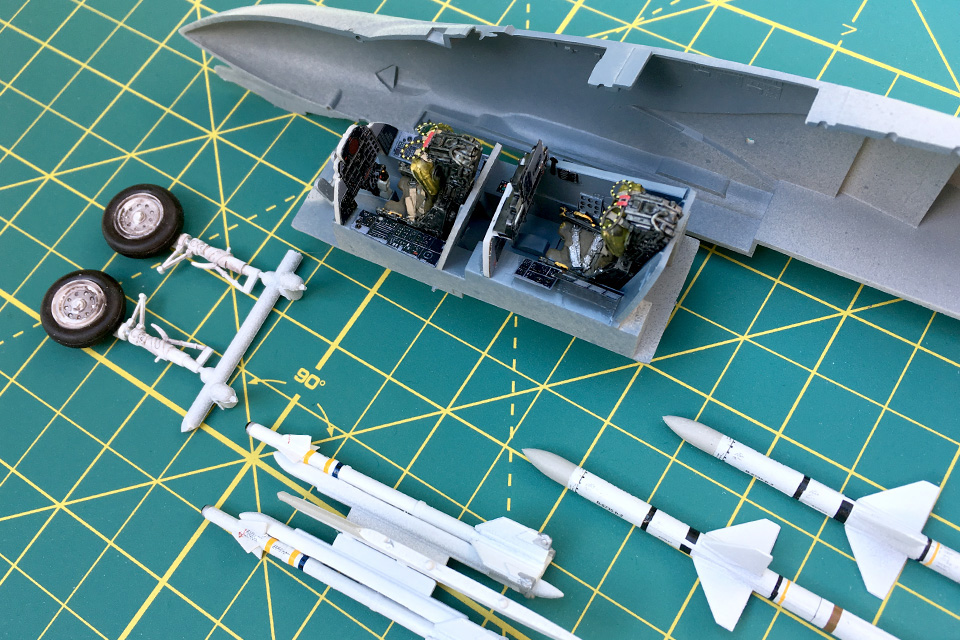
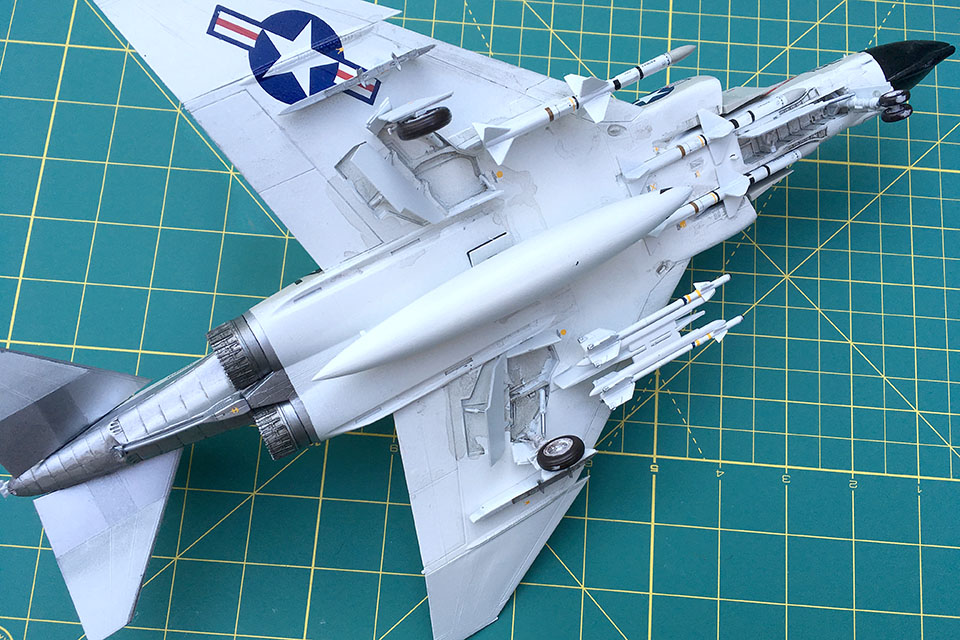
This Phantom was armed with three radar-guided AIM-7 Sparrows and two AIM-9B Sidewinder heat-seeking missiles. Paint the missiles white. The Sparrows have a light grey nose cone. Give the Sidewinders a black seeker head and add a drop of clear gloss to mimic the lens. Two Bobs Decals makes a decal sheet specifically for these kinds of missiles (48-086), helping to give each weapon some visual authenticity. Cement the AIM-9s to the two missile rails that will be attached to one of the inboard wing pylons (G-5 or G-6) and a single Sparrow to the other. Set the completed assemblies aside.
With the cockpit complete, glue it to the right side of the fuselage and bring the two valves together. Assemble the top and bottom halves of the wing and attach them to the completed fuselage. It’s a nice snug fit, so there’s very little filling and sanding to get those seams just right. Assemble the engine intakes, but save the two “splitter plates” (D-27 and 28), just forward of the intakes, for later. Fill and sand where needed.
Over time the F-4 upgrades added bulges, bumps and antennas to the airframe. For this early F-4B a couple of those bumps will need to be removed. Using a craft knife, remove the two sensor bumps on the top edge of the vertical stabilizer and sand to shape. Likewise, there are two sensors under each intake that should be removed.

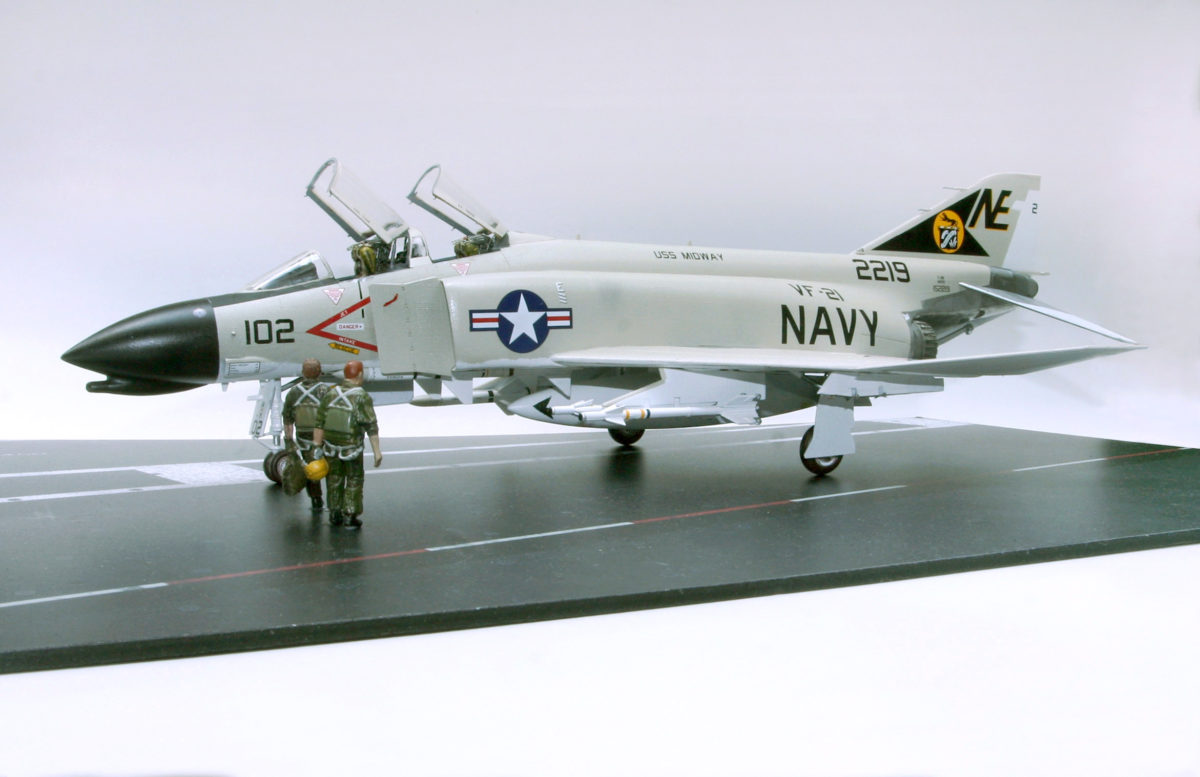
With the bulk of the Phantom complete, it’s time for some paint. The camouflage scheme for Navy aircraft of the time called for white undersides, including the insides of the wheel wells. The upper surfaces are painted light gull gray (FS36440). It technically has a matt finish but you’ll need to use a clear gloss before adding decals. Moveable surfaces—rudder, flaps and horizontal stabilizers (but not the ailerons)—are white on both top and bottom. Add a black matt anti-glare area from the cockpit forward to the radar nose cone, which is painted an overall gloss black.
Add a clear gloss coat to the interior of the wheel wells and speed brakes, using a dark wash to pick out the detail and give these areas a well-worn look. Carrier aircraft spent a lot of time exposed to the weather. Refer to photos from the time and add some daily grime to the underside of the jet.
The lower section of the rear of the airplane is a metallic, titanium color, as are the inner part of the horizontal stabilizers. Check your resources and the instructions for the correct areas to mask off. Attach the horizontal stabilizers once they’re finished, making sure to have the correct anhedral that is part of the Phantom’s signature silhouette.
Detailed Resin extras make a difference
The Hasegawa F-4 kits have a nice level of detail, but the afterburners are inaccurate. Eduard comes to the rescue again with a beautiful set of “burner cans” designed for this F-4B kit. Assemble the pair, painting them a dark titanium color and use a black wash to make the fine resin detail pop. A mix of dark and white pastels can simulate the heat marks inside the afterburner created by the 17,900 pounds of thrust delivered by each of the General Electric J79 engines. Slide the pieces in and cement in place.
The kit comes with two types of canopies. One is a single piece affair, the other comes as four separate pieces, designed to be posed open, showing off all that hard work inside the two cockpits. Mask off the canopy pieces, paint and set them aside.
With the camouflage complete, give the model a coat of clear gloss and get to the decals. Furball’s Bravo MiG Killers, Part 2 has markings for both jets involved in the June 17, 1965, engagement described in the cover story of the July 2020 Aviation History. The story is told through the experiences of Lieutenant Dave Batson and his RIO, Lt. Cmdr. Rob Doremus. The pair would ultimately down two North Vietnamese MiG-17s that day.
Carefully begin cutting out and applying the decals. Batson’s and Doremus’ names do not appear on the canopy rails of the jet they flew that day, which was assigned to Commander Lou Page and Lieutenant J.C. Smith, the crew flying the other F-4B involved in the engagement. It is not uncommon to fly a mission in a fighter that has someone else’s name on the canopy rail. Detailed artwork included with this set of markings ensures an accurate result. The Furball decals go on easily and with a gentle setting solution look great. Seal the decals with a clear coat and set aside to dry. Don’t forget the tiny MiG-17 silhouette on the splitter plate in front of the engine intake!
Add a modest amount of weathering, especially to the underside and rear of the jet. The GE J79 engines were notorious for their telltale smoke trail, so add a dark chalk pastel color to the rear of the engine’s exhaust where soot would collect, baked against the metal by the hot afterburner.
Adding the final touch
Attach the landing gear, the slightly opened speed brakes and the centerline external fuel tank. Add the two inner wing pylons (G-5 and 6) with the weapons completed earlier—Sidewinders on the left and the pylon with the single Sparrow on the right. The other two AIM-7 Sparrows should rest in two recessed areas under the fuselage. There are four stations designed specifically for that type of missile; be sure to cement the pair of Sparrows into the two forward spots.
Finally, add the clear canopies painted earlier. The flat pane of glass on the forward section actually has a light blue tint. You can get this effect by using a blue highlighter marker on the inside of the clear plastic piece to create the translucent color. Two small hydraulic struts (D-13) hold the canopies open at the same angle. Remember to add the gunsight from the Eduard detail set.
Your Phantom is ready to be next in line for the catapult and another sortie in search of more MiGs!
Read How Navy Aircrews Scored the First MiG Kills Over Vietnam from the July 2020 issue of Aviation History. To subscribe, click here!