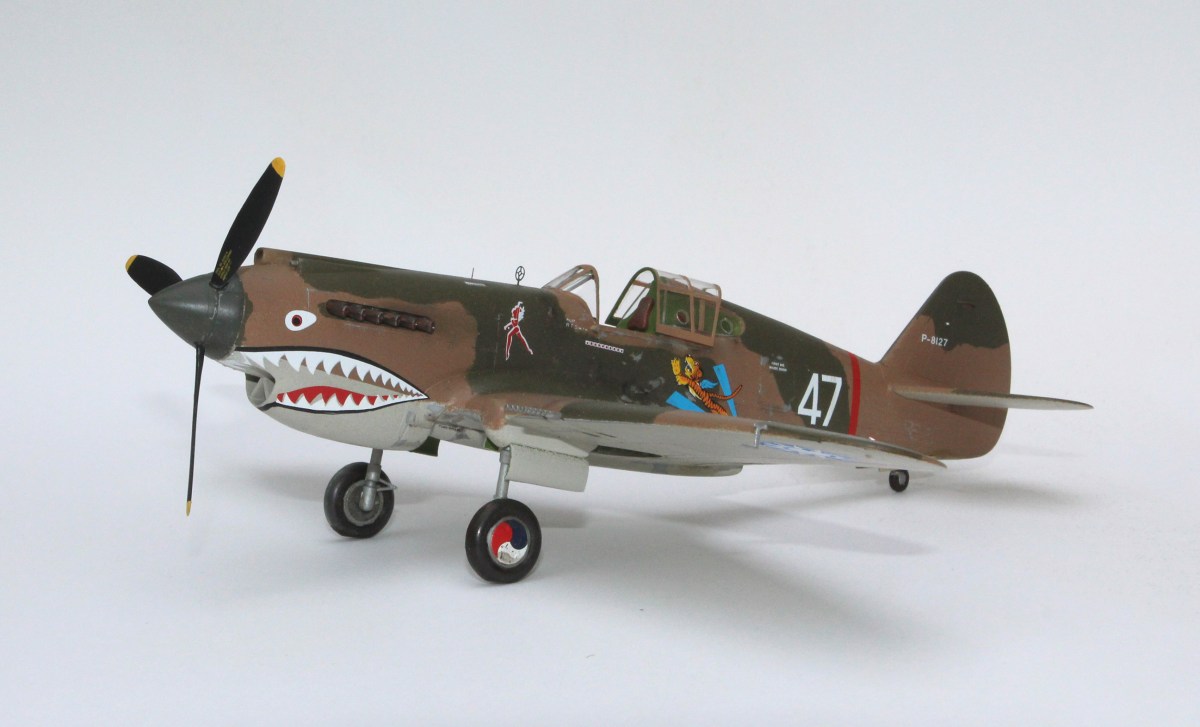
Probably no other aircraft from World War II are as easily recognized as the shark-mouthed Curtiss P-40s flown by the “Flying Tigers.” Colonel Claire Chennault, leader of the famed American Volunteer Group (AVG), received his P-40s (the export version, or Hawk 81-A3s) when the U.S. government financed 100 P-40Bs, diverted from a British contract. The British had nicknamed them “Tomahawks.”
Reportedly, Chennault got the inspiration for the shark mouth from a magazine story about the Royal Air Force’s (RAF) No. 112 Squadron serving in North Africa. While the AVG never had more than three squadrons of 18 aircraft each, their exploits against the Japanese became legend, and as a result the famous shark mouth was copied the world over.
Model manufacturers have reproduced the Flying Tiger P-40 in all the popular scales. In this column we will be working with the Hobbycraft 1/48 scale AVG P-40 kit. This is an excellent kit for the beginner, but at the same time, more experienced modelers will find it a good base for super detailing.

Since these aircraft were taken from RAF stocks, the cockpit tub and fuselage sidewalls are painted with Model Master’s “British Interior Green.” The instrument panel is flat black. The instruments are raised and “pop out” with a dry brushing of light gray. Put a drop of five-minute epoxy on each dial face to simulate the glass cover. Paint the seat aluminum and make seats belts from paper strips.
Join the fuselage parts together. From the underside, glue the instrument panel and cockpit into place. This is tricky, so follow the kit instructions carefully or your cockpit will be off-center in the fuselage.
Assemble the wings and attach the horizontal stabilizers. Make sure they are perpendicular to the tail. Attach the wings and make sure they maintain the proper dihedral. Carefully attach the nose machine guns. When you have completed the basic construction of the kit, spray or brush a thin coat of a light color to highlight any flaws or seams. If assembled correctly, this kit will require very little sanding and filling.
An airbrush is recommended to give your model a professional look, but careful work with a quality brush is also acceptable. Cut thin strips of drafting tape to mask the cockpit clear parts. Attach the windscreen and the clear parts behind the hood with white glue. If you are using an airbrush, stuff a bit of wet tissue into the open part of the cockpit to keep out over-spray.
The Flying Tigers’ aircraft were painted in “soft edge” British camouflage colors of dark tan and dark green on the topside. (I used Model Master Dark Tan ANA 617 and Gunze Sangyo Dark Green H-320.) The underside was a bit of a problem. The British used “Sky” for the underside of their aircraft in 1940 and ’41. Some color reference photos and paintings show the underside of the Flying Tigers as light gray. I decided to go with gray, FS-36375 (Gunze Sangyo H-308).
When painting is complete, apply a coat of Future acrylic floor wax or spray Testor’s Glosscoat over the entire model to provide a glossy surface for the decals. (The exact color that should be used on any aircraft is a hotly debated topic among modelers. I’ve always taken the position, “if it looks right, it probably is right.” You be the judge.)

The kit decals allow you to reproduce two Tigers, however, there are plenty of excellent aftermarket options. EagleCal decals produces sheets for all three Flying Tiger squadrons. I used their set of markings for Robert T. Smith’s colorful “#47” from the AVG’s 3rd “Hell’s Angels” Squadron in Burma (EC #32). Since the AVG were officially flying for the Chinese Air Force, the aircraft carried the Nationalists’ blue-and-white sun insignia on the wings.
The landing gear legs are painted flat aluminum. I used Gunze Sangyo’s Tire Black for the tires. A decal is provided for the wheel hubs. Paint the wing guns with Model Master Gunmetal and attach them with white glue. Finish the model by gluing the tail wheel into place along with all the landing gear doors and the Pitot tube.
The Flying Tigers operated under horrible climate and supply conditions. As a final touch, you can “weather” your Flying Tiger by dry brushing light gray over the panel lines to simulate wear. Another weathering technique is to spray a very thin mixture of flat black between the panel lines to simulate an accumulation of dirt and grime. With all weathering techniques, go lightly. Apply a final light coat of Testor’s Dullcoat to seal the decals and the painted finish. Remove all the masking from the clear parts, and your model is complete.