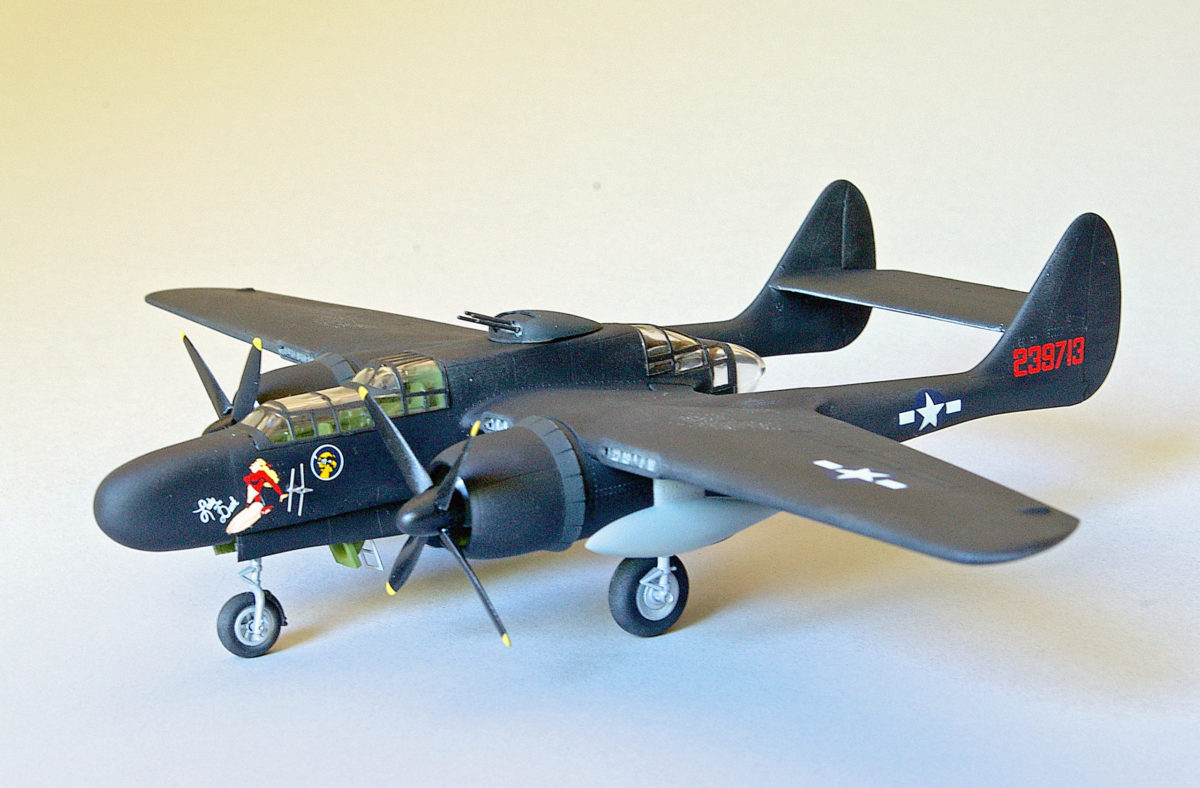
One of the most famous Northrop P-61 night fighters was a Black Widow from the 548th Night Fighter Squadron named Lady in the Dark. On the night of August 14, 1945, Lady claimed the last official aerial victory of World War II by forcing a Nakajima Ki.43 “Oscar” to crash into the sea. A 1/72nd scale model of that aircraft is produced by Dragon, kit no. 5017-01.
Construction starts with painting the cockpit and wheel wells “interior green,” FS-34151, rather than “chromate green” as indicated in the kit instructions. Lady in the Dark was a late B model, equipped with a quad .50-caliber top turret and four fuselage-mounted 20mm cannons.
After painting the instrument panel “aircraft interior black,” FS-37031, glue it to the front portion of the cockpit floor. A light dry brushing with light gray will bring out the details of panel. You can make seat belts from strips of paper dipped in black coffee, draping them over the seats while the paper is still wet.
Paint the sidewalls, then glue them into position along with the cockpit interior and close the fuselage sections. The plastic in the fuselage was slightly warped in my kit; note that if this is the case, you may need tape to hold the pieces together until the glue dries.
Paint the radiator intakes on the leading edges of the wings silver and then cement the top and bottom wing sections together. This model is very tail heavy and will require quite a bit of weight in the forward portion of the model to keep it from becoming a “tail-sitter.” The bulbous nose radome is ideal for holding about a dozen BBs secured with a puddle of white glue.
Additionally, fill the engine cowlings with BBs, secure them with white glue and set these sections aside to dry. Next glue the wings to the fuselage. The joint here will require an application of putty.
Now assemble the twin-engine booms and attach them to the wings. The booms must be exactly square to the wings, or the horizontal stabilizer will not be level.
Next attach the radome, filled with weights, to the fuselage. Note that the joint is poor here, so you’ll need several applications of filler to blend it into the fuselage. When all of the putty has dried, sand it to blend the seam so there are no visible gaps. Once sanding is complete, spray on a coat of primer to hide any imperfections.
Black Widows were delivered to Pacific units in gloss black. The glossy paint made the aircraft virtually invisible in the night skies, but humidity, blowing sand and the tropical sun quickly dulled the finish. To duplicate this scheme, paint the entire aircraft with Model Master aircraft interior black and then pick out selected panels and spray them with Tamiya’s “NATO black.” The contrast of these two blacks will add a subtle impression of weathering to the model. The appearance of additional weathering can be accomplished by lightly brushing streaks of silver on the leading edges of the wings.
Next apply a coat of gloss to provide a smooth surface for the decals. The nose art was painted on both sides of the fuselage, but unfortunately the starboard-side decal figure is facing the wrong direction on the sheet. There’s a color drawing of this aircraft’s artwork in Squadron/Signal’s P-61 Black Widow in Action.
Painting the extensive framing on the “greenhouse” canopies is a daunting task, but it will be simpler if you first mask and paint all of the vertical braces, then—when those are dry—mask and paint the horizontal frames. Once you attach the canopies with white glue along with the landing gear, gear doors and etched metal antennas, your own Lady in the Dark is ready for a night mission.

