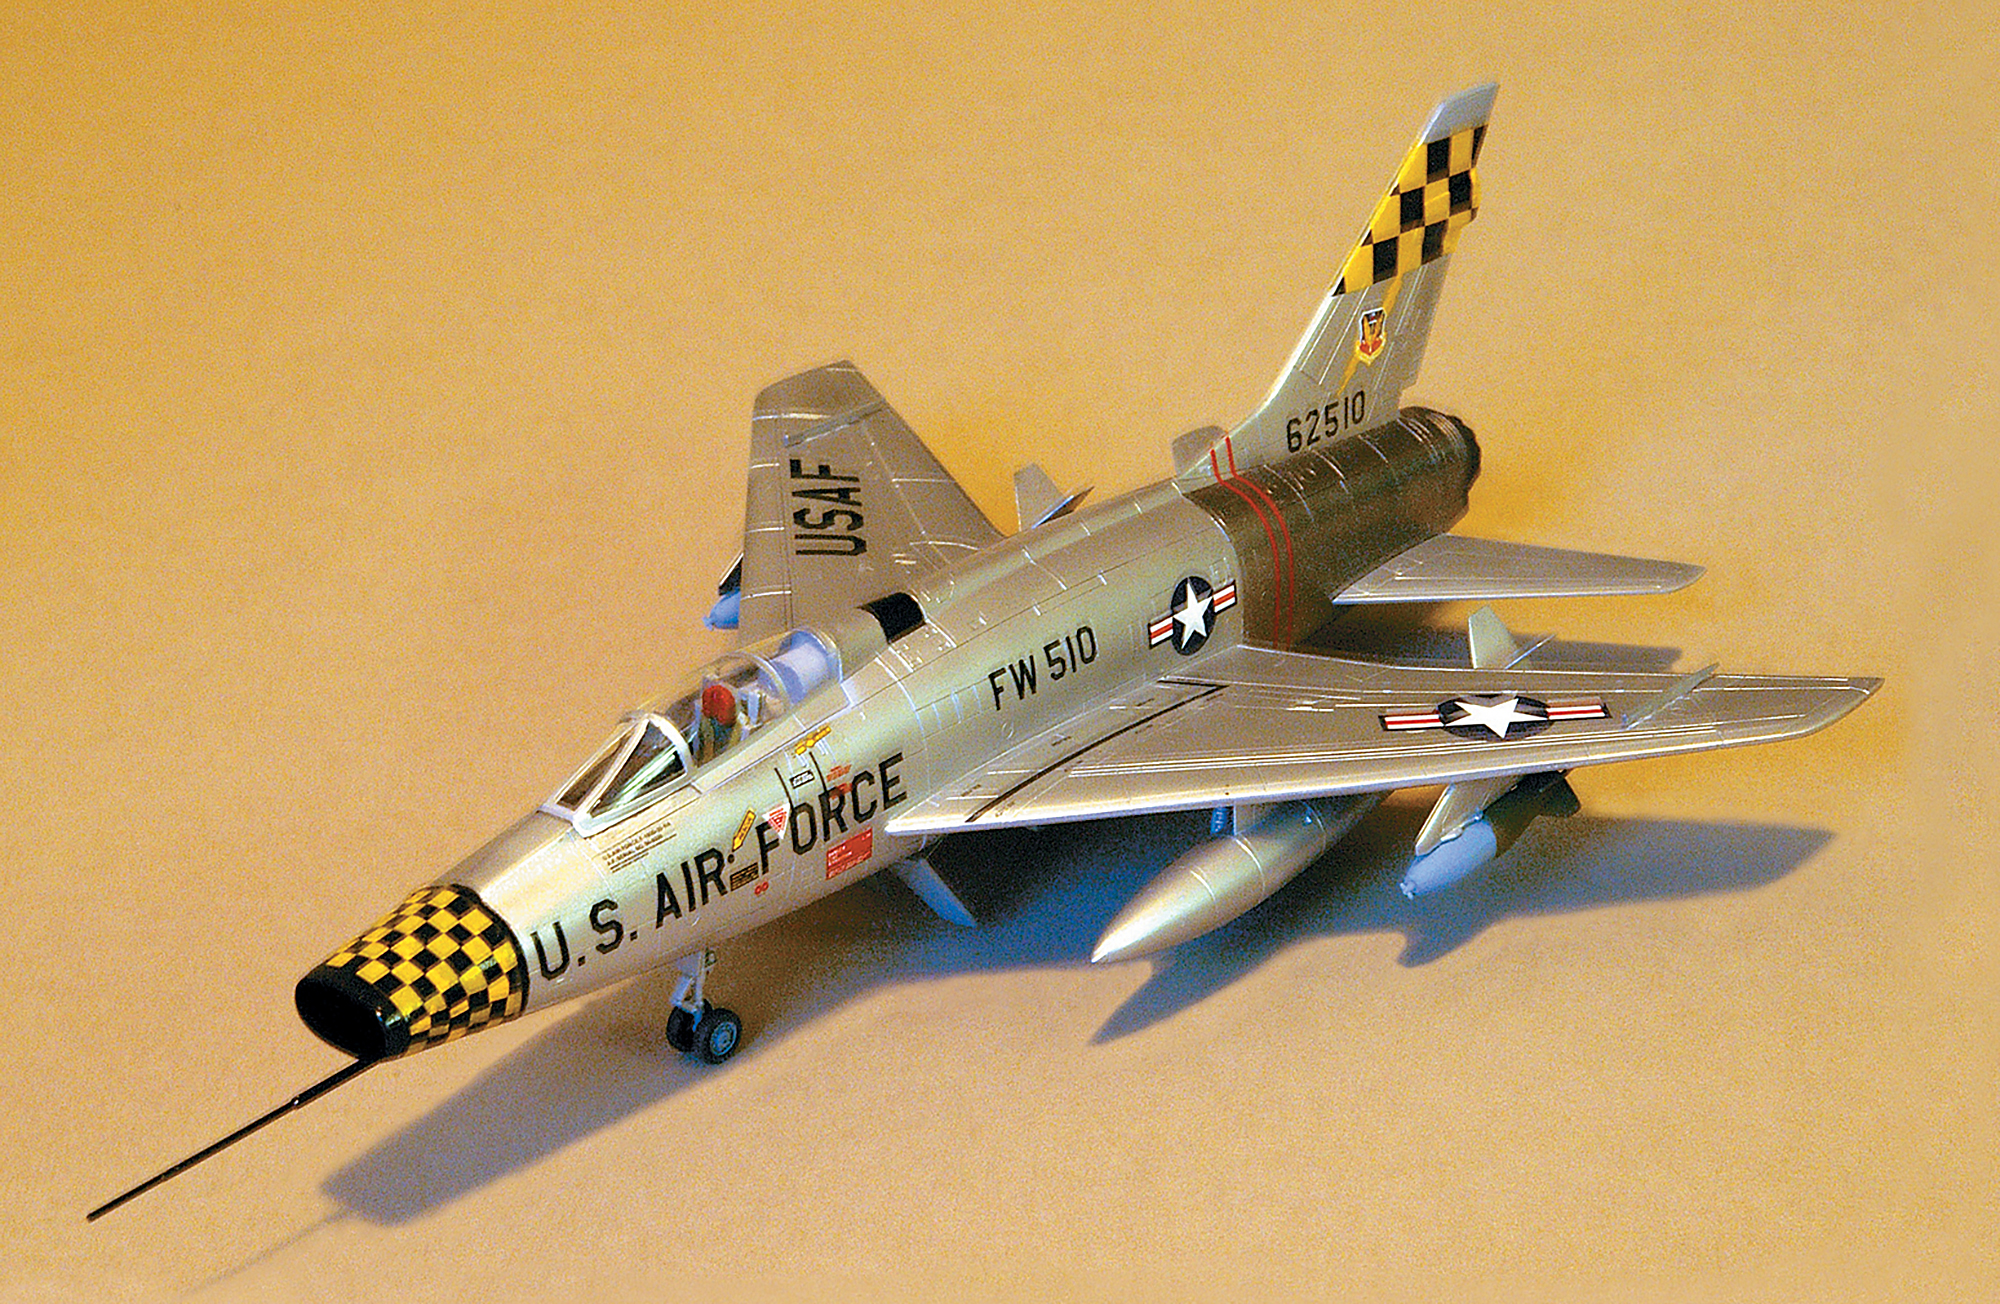
When it was introduced into the arsenal of the U.S. Air Force in the 1950s, the North American F-100 became the first fighter to attain supersonic speed in level flight. Early models of the “Hun,” as it was nicknamed, had minor development problems early in its career, but most had been worked out by the time the definitive D model reached operational squadrons.
A 1/48th scale D model by Monogram, now out of production, can often be found at garage sales and swap meets. The only readily available kits of the F-100 are the 1/72nd scale F (a two-seater) and D models from Italeri.
Our project begins with the “front office” of the single-seat D model, which consists of a three-part ejection seat, cockpit tub and instrument panel. The centerfold of the Squadron Signal book F-100 Super Sabre in Action shows the cockpit and instrument panel in light gray. The ejection seat rails are also light gray with dark green cushions and red headrest.
Cement several BB’s with white glue into the forward portion of the fuselage to keep the model from becoming a “tail sitter.” The finished cockpit tub sits on top of the nose gear bay. Dry fit these parts before gluing them into place, to make sure they are aligned correctly before closing the fuselage.
The nose intake should be cemented to the fuselage, but hold off on attaching the horizontal stabilizers until after you’ve painted the model. If you’re building an early D model, use exhaust cone part 30A. After gluing the top and bottom pieces of the wings together, attach them to the fuselage. Note that there is a small gap at each wing root that can be filled with a quick swipe of putty.
There is a small gun panel that should be inserted into the bottom of the fuselage of the D version of the model. It fits poorly and will take considerable time to work into place. Since filling and sanding the gaps around this panel with putty would destroy its detail, I opted to use several applications of white glue to seal the spaces.
Early F-100s entered service in bare aluminum, but corrosion problems soon led to painting the aircraft with silver lacquer. Aircraft assigned to the Air Force’s Fighter Weapons School at Nellis Air Force Base in Nevada appear to have been sprayed with this silver coating. To achieve this finish on your model, first carefully sand all seams and puttied areas and polish them to a scratch-free state.
A coat of a glossy gray primer will highlight any imperfections and provide a base for the silver. You can use several products to duplicate the natural metal finish, but I’ve found Floquil’s “bright silver” to be the best. (This is a lacquer-based product and should only be used with plenty of ventilation.)
When the silver is completely dry, mask off a section of the nose and paint it gloss black to serve as a background for the markings to be applied later. The afterburner of the F-100 scorched the aluminum on the aft section of the aircraft and left a telltale darkening of the metal. To duplicate this burned effect, I masked off that area and sprayed it with Model Master “magnesium.”
Markings for an F-100 that was likely flown by John Boyd at Nellis consisted of black and yellow checks on the vertical tail and a similar pattern wrapped around the intake. There are no decal sheets for these markings, so you’ll have to improvise.
AeroMaster decal sheet 48-091, the Checkertail Clan, a sheet for a 1/48th scale P-51D, contains various sizes of yellow and black checks that suit our purpose. The tail bands on the F-100 can be pieced together from the decals used on the horizontal stabilizers of the P-51. The smaller nose checks are cut from decal portions that are meant for the wingtips of the Mustang.
You can take the national insignia from the kit decals, but the “USAF” for the wings, the buzz numbers and “U.S. Air Force” lettering on the fuselage, which are dark blue, are available on Scale-Master sheets 18 A and B.
After painting the landing gear, speed brake and fuel tanks silver, attach them. Mask and paint the canopy. Once you’ve painted the horizontal stabilizers, snap them into place on the aft portion of the fuselage. Your model of an F-100D is ready for display.
Originally published in the November 2006 issue of Aviation History. To subscribe, click here.