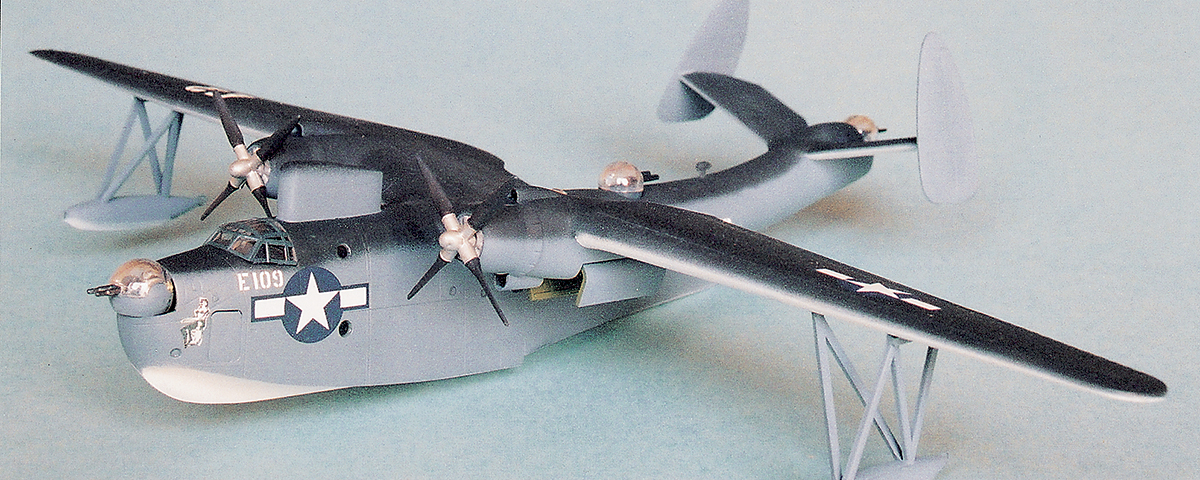
Aviation historians generally agree that if it had not been for the Consolidated PBY Catalina, the Martin PBM-5 Mariner would have been considered the most famous flying boat of World War II. Model kits of Mariners are rare birds, mostly to be found at model enthusiast swap meets and at some specialty hobby shops. Mach 2, from France, did produce a 1/72nd-scale kit of the PBM-3, but it is not currently in production. A 1/48th-scale PBM-3D/3S kit was released by the Pend Oreille Model Company. A collectors item now, it sells for $200 and up, if you can find it on eBay. A somewhat scarcer but more reasonably priced kit by Revell was first released in 1957 in 1/118th scale. Its 1982 “History Makers” rerelease is the subject of our modeling project.
There is no interior for the model. Initial construction calls for the placement of several clear parts that comprise porthole-style windows spaced along the fuselage. Since these tiny “windows” are more trouble than they are worth, we’ll handle this step after painting. The placement of the nose, dorsal and tail gun turrets is called for next, but we’ll also postpone this step.
The doors on either side of the nose and on the aft section of the fuselage should be attached by cementing them from the inside. Careful trimming and sanding is needed to get these parts to fit snugly.
With the doors attached, cement the fuselage sides together. Next fill in the two antennae “dimples” on either side of the cockpit with model putty. Since our Mariner had an earlier type of search radar, cut off the kit’s pylon-mounted APS-15 pod. I fabricated a new radome by laminating four 7/8ths-inch- by-3/8ths-inch rectangular strips of .040 sheet plastic together. (I determined the approximate size of the radome by comparing points on PBM-5 fuselage photos from Combat Aircraft of the World, edited by John W.R. Taylor, and Jane’s Encyclopedia of Aviation to points on the model’s fuselage.) I sanded the new radome to shape by using the same references. After that I glued the radome to a point just behind the cockpit.
The horizontal stabilizers should be cemented in place next. When attached, they need to fit at an upturned angle. The vertical tail surfaces, when positioned, should slant inward, which gives the Mariner its unusual tail configuration.
Next assemble the gull-shaped wings and attach them to the fuselage. A little cutting and trimming will be necessary here to get a tight fit. Assemble the right and left wing outrigger floats, which should be attached once the painting is complete.
Check over your work and fill and smooth any seams. A coat of a light gray primer comes in handy to highlight any remaining imperfections.
Some WWII Mariners served in a three-tone camouflage scheme of white (FS-17875) on the underside of the fuselage, wings, horizontal stabilizers and floats; intermediate blue (FS-35164) on vertical surfaces; and dark sea blue (FS-35042) on the top of the fuselage, wings and horizontal stabilizers. I used Squadron/Signal Publications’ U.S. Navy Aircraft Camouflage and Markings, 1940-1945, by Thomas E. Doll, as a painting reference.
The moldings for the engine fronts are crude, but painting them aluminum with a dry brushing of black will bring out the details. The propellers should be sprayed flat black with silver cuffs.
Petty Officer 3rd Class Jack Christopher served on a PBM-5 with nose art of a young woman clad in revealing undergarments. According to Christopher, the figure was painted in black and white. Working from a photo, I copied the artwork on my computer, reduced it in size and printed Dinah Might on white decal stock. The aircraft’s identification numbers E019 were taken from a Super Scale decal sheet of white letters and numbers, #72-26.
The national insignia were taken from a Scale Master sheet of stars and bars, #SM-26. The last details to be painted are the frames of the “greenhouses” over the cockpit and the gun turrets. In this small scale, that job can be tedious. The task can be simplified by masking and painting all of the horizontal braces in one step. When these are dry, repeat the process for the vertical supports.
The porthole windows, left over from an earlier step, can be simulated now by filling each hole with a drop of Micro Crystal Clear or white glue applied with a toothpick. Finally, assemble the gun turrets with white glue, snip off the locating pins on the bases, and glue them into position. Attach the assembled and painted floats, and your model of a Martin Mariner PBM-5 patrol bomber is complete.
Read more about the Martin Mariner here, from the May 2004 issue of Aviation History. Subscribe today!