The Republic F-105 Thunderchief took on a variety of combat missions during the Vietnam War that it was never meant to perform. Hunting surface-to-air missile (SAM) sites is one of the most daunting roles any fighter can undertake, but for the huge, lumbering “Thud” it was just another of the myriad roles that made the aircraft a workhorse in the skies over Vietnam.
The Revell/Monogram F-105D and two-seat F-105F/G were first released in the mid-1980s. At the time they were on the cutting edge in terms of detail and accuracy, particularly in 1/48th scale. Despite a couple of excellent (and higher priced) kits out on the market today, this classic is a great, moderately priced alternative.
Start with the cockpit. Get out that tiny brush to help pick out the knobs and dials of the nicely raised cockpit panel detail. Using a toothpick and thinned white glue, carefully fill the dials and the radar scope. The glue dries clear and looks just like the glass over the instruments. The single-piece seats have nice detail: Highlight the harness and don’t forget that bit of red on the headrest.
Set aside the cockpit tub, control panels and seats to dry. Assemble the tires and landing gear, painting the struts, legs and the interior of the landing gear bays gloss white. Use a dark wash to pick out and highlight the pipes and electrical harnesses that run through the jet. A bit of chrome enamel paint on the oleo section of the landing gear is a great little detail. Set the completed landing gear assembly aside. Finish and install the cockpit and the nose landing gear bay, then join the fuselage halves.
Once the fuselage is together, don’t forget to add the two long blisters that make up the ALQ-105 electronic countermeasures system. The ALQ-105 was an important part of the conversion of the F-105F to the F-105G Wild Weasel III. The inclusion of these blisters as separate pieces means you have the option of building the earlier F-model jet. Check your research to see if the particular jet you’re building needs these parts.
While the fuselage dries, assemble the wing, centerline fuel tank and one of the other two underwing tanks.
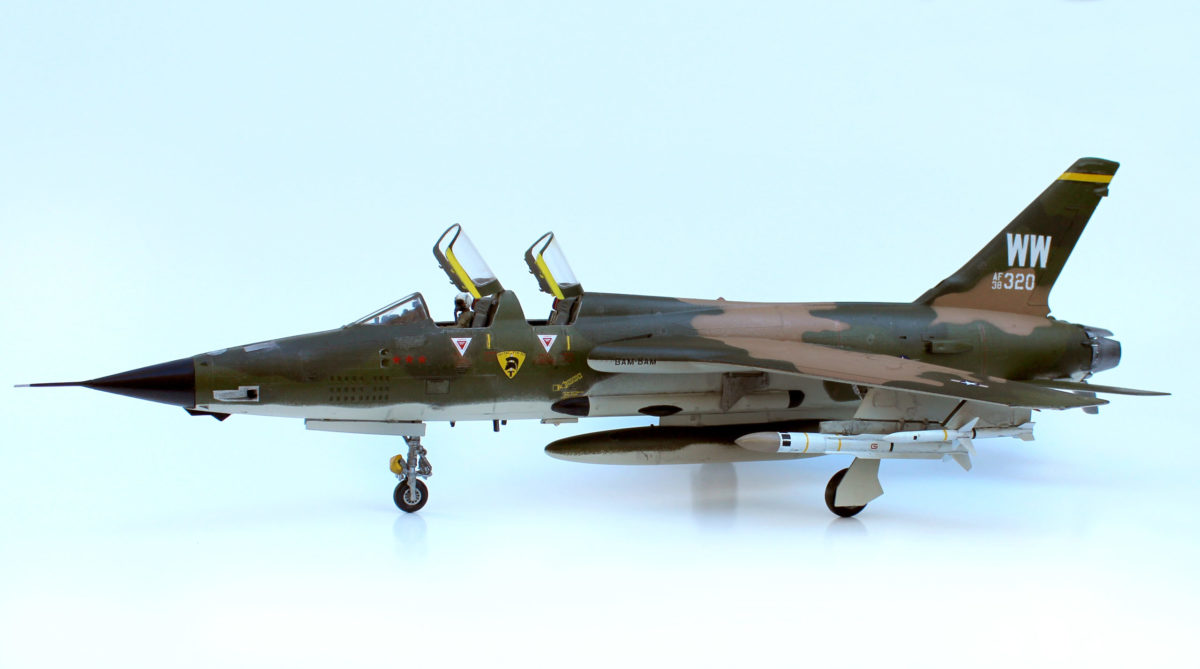
It’s time to give the Weasel its teeth. The F-105G usually carried two radar-homing AGM-45 Shrike missiles on the outboard wing pylons. The fighter could also carry the longer-range AGM-78 Standard ARM (anti-radar missile). The larger (15-foot-long) ARM was hung from the underwing hardpoint usually occupied by the other fuel tank. The missiles included in the kit are nice, but the ordnance that comes in Hasegawa’s specialty kit—“Aircraft Weapons C, U.S. Missiles and Gun Pods”—are more accurate and have crisper detail. Paint them white with black and yellow bands and detail. Black and yellow are colors that denote “live” weapons.
Put the subassemblies aside and check the fuselage and wings for areas that will need a little putty. Fill and sand as necessary. Carefully cut masks for the classic Southeast Asia camouflage color scheme of medium green (FS34102), dark green (FS34079) and dark tan (FS30219), with light gray (FS36622) undersurfaces. Good advice at this point…take your time. Attach the wings to the fuselage and start masking and spraying color. Once you’ve peeled away the last of the camouflage masks, seal your hard work with a spray of gloss coat and prepare the model for decals.
Be patient and let everything dry at least overnight. The “Thud” is a popular subject among modelers and there are plenty of options when it comes to decals. I selected the markings for F-105G serial no. 63-8320. Today “320” is at the National Museum of the U.S. Air Force in Dayton, Ohio. It’s displayed in the markings it wore when it was assigned to the 561st Tactical Fighter Squadron based at Korat Royal Thai Air Base in 1972-73.
Once the decals have set, another clear coat helps protect your work. A bit of light weathering—a little soot around the gun port on the nose, chipping paint around the refueling port and a normal amount of grime—will give your Thud some character.
Time to add the completed landing gear and underwing stores. The missiles should look just a bit cleaner than the rest of the jet. Last but not least, carefully attach the cockpit canopies, making sure each one is raised at the same angle. Now you can push back and admire your work. Your Wild Weasel F-105 is complete, ready to taxi out and head “downtown” hunting for SAM radars.