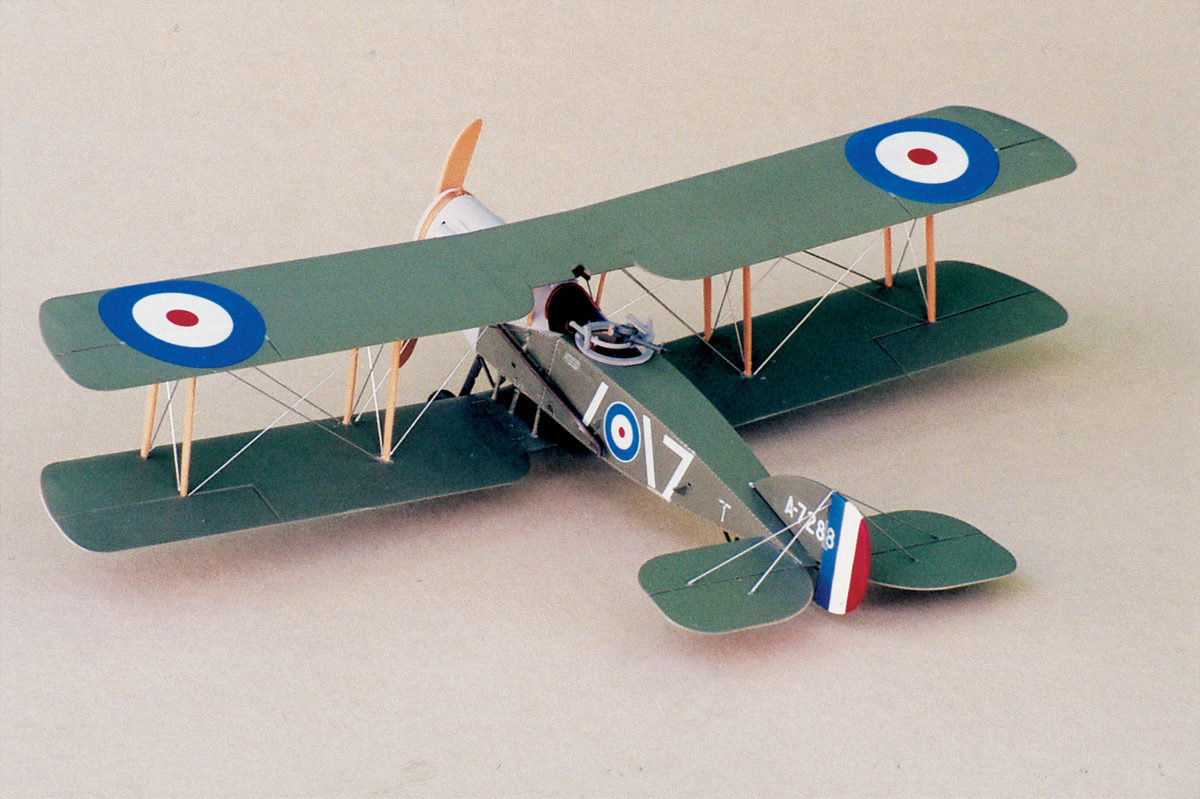
When the Bristol Company’s F.2A made its World War I debut over the Western Front on April 5, 1917, German fighters had a field day. Of the six British aircraft from No. 48 Squadron that entered the fray, four were shot down in quick succession.
The details of that inauspicious event were soon forgotten with the introduction of the definitive model of Bristol’s two-seater, the F.2B. The new version featured a powerful Rolls-Royce Falcon engine and improved design.
There are two excellent kits of the F.2B in 1/48th scale. One is from Eduard, the other from Roden. We’ll use the Roden kit, since it contains the markings for Lieutenant Andrew E. McKeever, who was credited with 31 victories between June and November 1917, all in an F.2B.
Construction begins by painting and detailing the 12-cylinder Rolls-Royce Falcon engine. This is a model in itself, but it is completely hidden after the next step, when it is trapped inside the front of the fuselage. (Some modelers may want to cut open a maintenance panel, so the engine can be seen.) After painting the radiator “aluminum,” push the gearbox into the hole in the radiator and cement it into place.
The pilot’s cockpit and the gunner’s position should be tackled next. Paint the interior sidewalls of the fuselage with Gunze Sangyo’s “sand yellow” (FS-33531), a shade that will turn out slightly darker than “doped linen.” All the additional colors for the cockpit are indicated in the instructions.
F.2B gunners carried seven ammunition drums for their Lewis gun. The kit provides one for the gun and six extras that should be painted with Model Master “gunmetal.” The seats have “leather” cushions with thin strips of paper for seatbelts. Slivers of plastic, painted silver, serve as buckles.
With the cockpit and gunner’s position complete, attach the engine compartment to the completed fuselage. Dry-fit this assembly to make sure everything lines up properly before applying cement.
Since this is a biplane, the wings must be painted before attaching them to the fuselage. The lower portion of both wings and horizontal stabilizers are the sand yellow we used earlier. When those are dry, paint the wing tops with “dark green,” FS-34079. This is very close to the PC-10 originally used on the F.2Bs. The interplane and cabane struts should be painted “wood.” The interplane struts then need to be attached to the bottom wing with white glue. Be sure these struts are perpendicular to the wing surface.
This next step is very important. There are support posts that fit into the bottom of the fuselage and attach the bottom wing. These parts were deformed in my kit, so I replaced them with 1⁄2-inch-long pieces of .035-inch styrene rod from Evergreen Scale Models. The rods should be glued at a slight inward angle and fit into indentations on the fuselage. These pieces must be carefully cut, or the bottom wing will fit improperly.
Stuff some damp facial tissue into the cockpits and the engine compartment (if you have cut a portion of it open) and spray the fuselage topside dark green and the underside sand yellow.
The decal stripes for the rudder do not fit well. I painted mine with “insignia red” (FS- 11136), “insignia white” (FS-17825) and “Blue Angel blue” (FS-15050).
When painting is complete, spray a coat of Testor’s Glosscoat over the entire model to provide a smooth surface for the decals. The markings for Lieutenant McKeever’s aircraft consist of large wing roundels, tail and side numbers and a pair of angled stripes.
With all of the major construction, painting and decal work complete, it is time to tackle the extensive rigging of the F.2B. This part of construction is time consuming and requires considerable patience. I use two methods to rig biplanes.
The first uses nylon thread and super glue. Start with a length of thread super glued to the base of one of the struts on the lower wing. Draw the thread to the top of the next strut, wrap it around the top, dab a bit of glue onto the thread and hold it in place with a set of reverse tweezers. Zigzag the thread up and down the struts until you’ve completed one wing.
The second method is the one I used on this model—and the one that seems to work best for photographic purposes. Using a pair of dividers, I cut lengths of .3-inch stainless steel wire from Minimeca to fit each bay. I then carefully attached each wire with white glue.
With the rigging complete, carefully attach the top wing and the tiny acetate windscreen to the cockpit, and your model of Lieutenant McKeever’s F.2B will be complete.
Originally published in the January 2006 issue of Aviation History. To subscribe, click here.