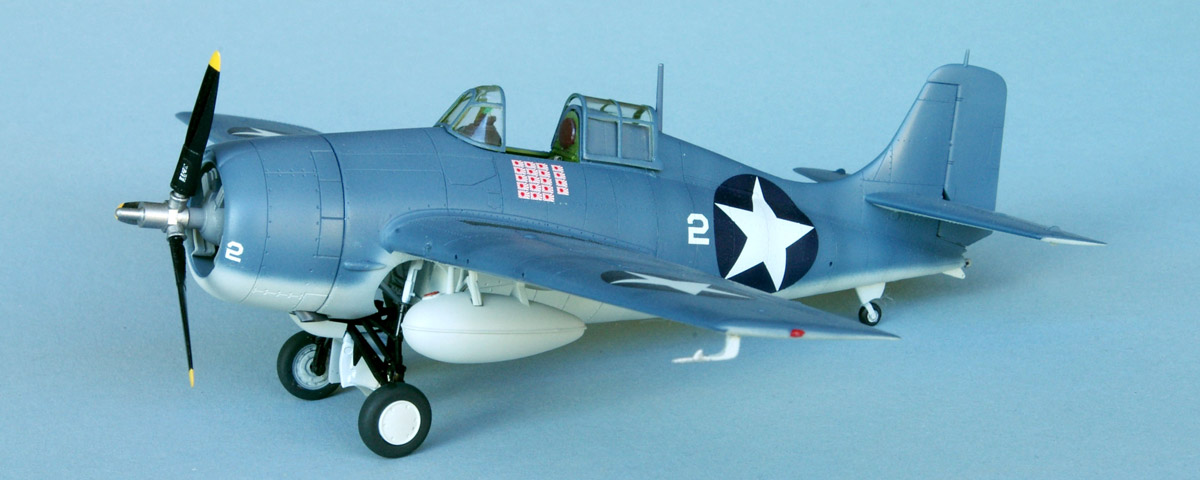
In the January 2005 issue we highlighted Lieutenant James Swett’s Grumman F4F-4. Now you can use that same kit to build a model celebrating the career of first-ever World War II Marine Corps ace Marion Carl. Tamiya’s 1/48th-scale F4F-4 Wildcat was released in 1994, and after more than 20 years is still rated the “best of the best” in any scale. It’s regarded as an award-winner out of the box, with no aftermarket additions, though this kit can be built into a museum-quality model with a few extras.
The cockpit is complete without additions, but Eduard has produced a set of etched details (interior set FE-246) that makes this front office even more realistic. First paint the cockpit interior green, FS-34151. Clip the etched pieces from the pre-painted fret and glue them to the instrument and side panels. Note the set includes a detailed throttle quadrant and full seat-harness parts.
With the cockpit finished, cement the landing gear bulkhead to the front of the cockpit. Then cement the completed assembly to one of the fuselage sides. While waiting for these parts to set solid, insert the horizontal stabilizer pieces into place and glue them from the inside of the fuselage sides. Once all these components are set, cement the fuselage parts together. Spray the gear compartment and upper portion of the landing gear insignia white, FS-17875. Paint and attach the intercooler to the inside of the gear compartment.
Tamiya has reproduced the wings with a somewhat overstated rivet pattern. Some light sanding will tone down the rivets before you position the upper portion of the wings and then glue them to the fuselage. Note that if you’ve attached the wings properly, there’ll be no need to clean up these seams later. Once the wing-top parts are dry, glue the bottom section into place, being careful not to damage the spindly upper landing gear assembly.
The Pratt & Whitney R-1830-66 Twin Wasp engine has been adequately replicated by Tamiya, but a resin version of the 1,200-hp power plant is available from Quickboost (QB 48-013). Paint the engine cylinders steel, then dry-brush with black to bring out the details. Next spray the crankcase light gray, FS-16495, and dry-brush it with silver to show wear from maintenance.
Next paint the interior of the cowling insignia white and set aside. When the engine parts are dry, cement them to the front of the fuselage. Do not attach the cowling at this time. The basic airframe construction is now complete, but you still have to assemble the lower portion of the landing gear and paint it gloss black, FS-17038. Marine Wildcat tires were very dark gray, an indication of the harsh conditions in which these aircraft served. Tamiya’s “NATO black” provides a good contrasting shade here.
The six .50-caliber wing guns are poorly represented in this kit. I drilled out the positions and inserted individual pieces of Minimeca 1.2mm x 20mm stainless steel tubing into the wings. Next assemble the long-range drop tanks and paint them light gray, FS-36495, to coincide with the Wildcat’s underside camouflage.
The topsides of land-based Marine F4F-4s were painted blue-gray, FS-35189. Once you’ve finished the painting, apply a coat of acrylic floor wax to provide a glossy base for the decals to adhere to.
The simple markings for Carl’s aircraft are from Cutting Edge decal sheet CED-48120. This model has appeared in some publications with significant weathering and wear. But it seems doubtful that a crew chief would allow a high-scoring ace’s aircraft to look scruffy, regardless of the conditions under which it served. Yours will appear to be well maintained.
Finish by painting the canopy and windscreen parts and cementing them to the fuselage using white glue. Finally, paint the propeller flat black, FS-37038, with insignia yellow tips.