
The 1/72nd-scale Messerschmitt Me-163 Komet rocket-powered interceptor from Hobby Boss (#80238) is ideal for a newcomer to modeling, or for a parent or grandparent who wants to teach youngsters plastic modeling techniques. It retails for under $10 and contains less than 20 parts, which can be assembled, painted and ready for display in one afternoon.
Construction starts with the two-piece cockpit, which should be painted overall black gray, RLM-66. The pilot’s headrest—the only other part included in the “front office”—should be brushed with red-brown, to simulate leather. You can use thin strips of paper as seatbelts, draping them over the seat back. Placing a dot of gloss black on the pilot’s control stick will add some interest to an otherwise very simple cockpit.
Next insert the floor of the landing gear well into the bottom section of the fuselage. Insert and glue the vertical stabilizer into the top portion of the fuselage, then cement the bottom and top sections of the fuselage together. The fit is excellent; you’ll need to use only a small amount of filler around the tail section. Flip the fuselage assembly over and position the two triangle-shaped brackets that support the landing skid-wheel trolley assembly. Once you slip the nose cone into place, basic construction is complete.
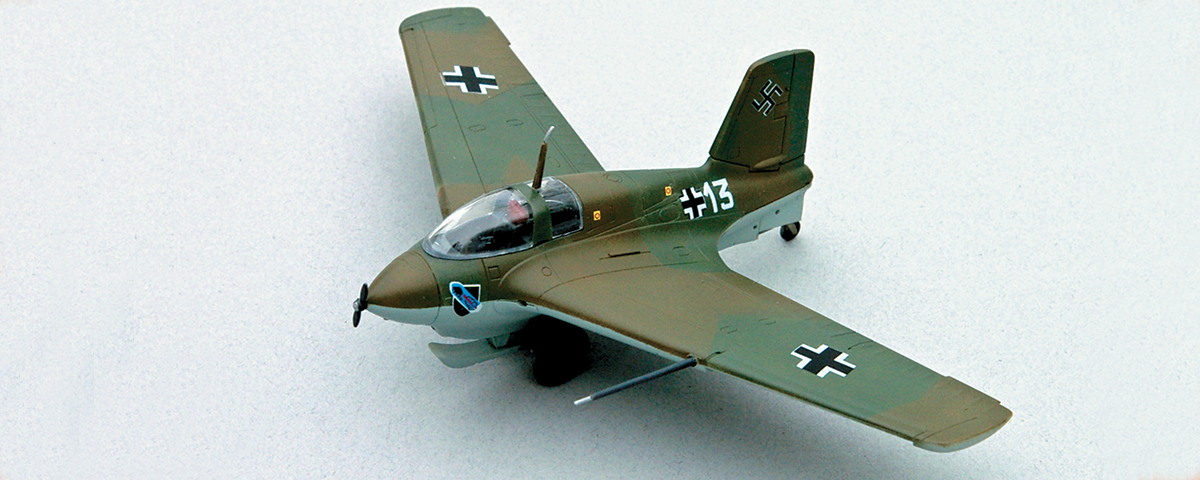
The instruction sheet contains color drawings for two aircraft, one of which is an operational Me-163B-1a from I Gruppe, Jagdgeschwader 400, based at Brandis in May 1944. Commanded by 1st Lt. Robert Olejnik, that unit achieved limited success, primarily attacking formations of Boeing B-17s. You can find a color drawing and profile of the camouflage pattern and unit markings on P. 225 of Warplanes of the Luftwaffe, edited by David Donald.
The kit decal sheet includes all of the markings for a JG.400 aircraft, as well as markings for a second option, a Komet captured by the British. The basic color scheme consists of the underside in “lichtblau,” RLM-76, and the topside in a “splinter” camouflage, a pattern of “dunkelgrün,” RLM-82, and “braunviolet,” RLM-81.
To get the best finish, spray-paint your model with an airbrush or aerosol can. You can easily duplicate the splinter camouflage using a brush. Once you’ve finished painting the fuselage, set it aside to dry. Brush the tires with very dark gray, to duplicate the color of German rubber used late in the war. Note that the kit contains an optional retracted or extended main landing and tail wheel assembly. Next paint the tiny nose-mounted generator drive propeller black, along with the pitot tube. Add those parts at the very end of construction, since they are fragile and easily broken.
Spray a light coat of clear gloss over the entire model to provide a smooth bed for the decal markings. Note that the decals will be easier to position if you use a small amount of decal setting solution, “snuggling down” over the engraved panel lines. With the decaling complete, spray a light coat of dulling spray over the model. Once you attach the canopy, using white glue, your Me-163 Komet, one of the Luftwaffe’s better known “wonder weapons,” is ready for display.