With the Battle of Britain won, Biggin Hill was at the forefront of a new RAF Fighter Command strategy.
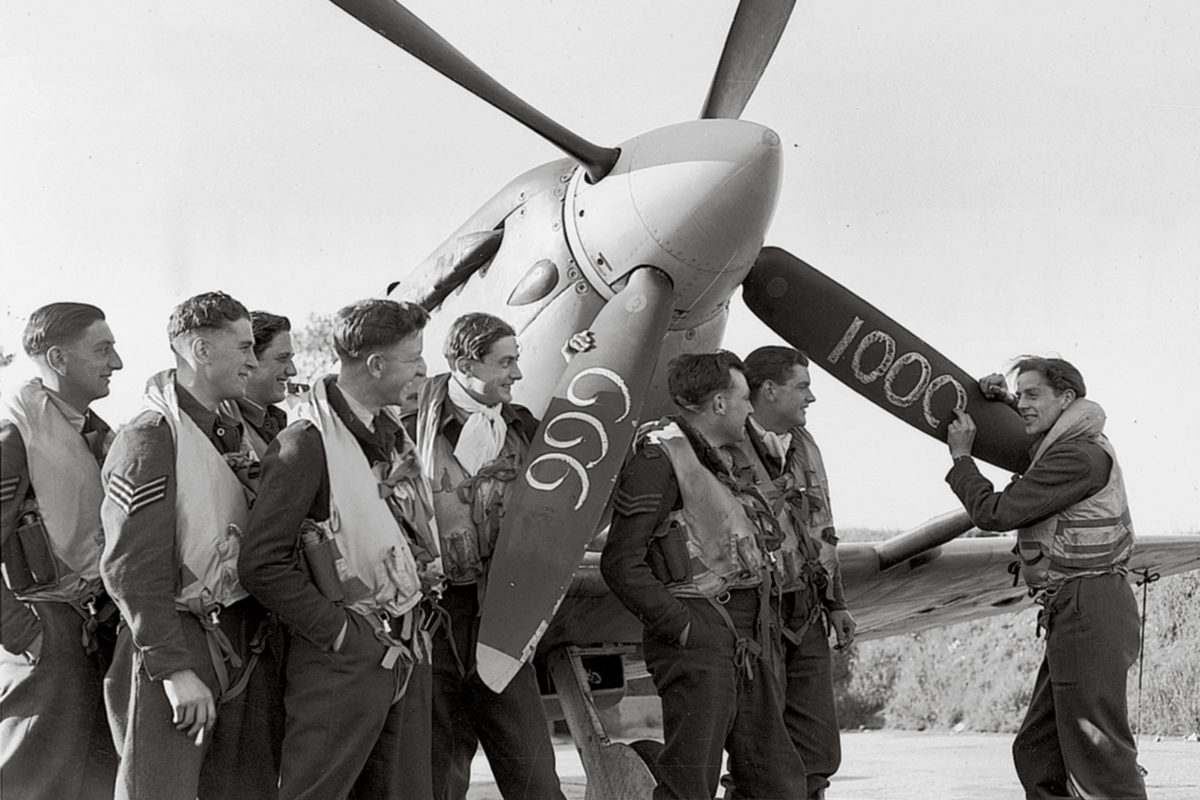
Leave was out of the question. The tension and realization of what was about to happen was clearly etched on the pilots’ faces. Those left off the duty roster expressed their bitter disappointment as the first weather reports came in. Three hundred pounds sterling was up for grabs, but more important for the pilots stationed at Biggin Hill on the morning of May 15, 1943, the magic number was 1,000.
World War II was a conflict filled with grim numbers and statistics. Like their World War I brethren, fighter pilots measured their skill by how many aircraft they shot down. In May 1943, the fighter squadrons flying out of Biggin Hill Station became the first to shoot down 1,000 enemy aircraft—a remarkable achievement and one that was shared by an international cadre of squadrons from the Commonwealth, Dominion and Free French.
After the Battle of Britain, Royal Air Force Fighter Command began a period of transition. Biggin Hill, which had seen continuous action from the very beginning of the war and grew to fame during the Battle of Britain as part of 11 Group, RAF Fighter Command, was at the forefront of the new strategy. With the threat of invasion over, Fighter Command adopted the wing system, the first two being Biggin Hill and Tangmere. The wing unit was based on the Gruppe system used by the Luftwaffe and was made up of three or four squadrons. In May 1943, two squadrons were flying from Biggin Hill, led by the brilliant and popular South African station commander Adolph Malan. Squadron No. 341 “Alsace” (Free French) was commanded by Commandant René G.O.J. Mouchotte, and No. 611 Squadron by Squadron Leader Edward F.J. “Jack” Charles. While the defense of England remained a high priority, RAF Fighter Command began a massive day offensive against the Luftwaffe based in northern France and the Low Countries.
The years 1941 through 1943 comprised a unique period in military aviation history. Never before had two opposing forces, equipped with the best fighters, shared the same level of experience and deadly expertise. After three years of almost continuous combat sorties, the Channel Front was the most sophisticated and lethal of all the Allied theaters of operations. RAF Fighter Command offensive operations began on June 14, 1941, code-named:
- Ramrod—attack by bombers (or fighter bombers) escorted by fighters;
- Rodeo—fighter sweep over enemy territory with no bombers;
- Roadstead—attack on enemy ships at sea by bombers or fighter bombers escorted by fighters;
- Rhubarb—small-scale attack by fighters, using cloud cover and surprise, to destroy enemy aircraft in the air and/or strike at ground targets;
- Circus—attack by a small force of bombers with fighter escort, intended to lure enemy fighters into the air to be engaged and destroyed by RAF fighters.
Leading the new strategy were squadrons from Biggin Hill, Tangmere, Kenley, Northolt, Hornchurch and North Weald. Their objective seemed simple: air superiority over northern France. The RAF believed their new assignment would bear fruit quickly due to the German invasion of Russia, which meant Luftwaffe fighter units in the West had been stripped to support the new offensive. Only two Jagdgeschwader, or fighter wings, JG.2 “Richthofen” and JG.26 “Schlageter,” with roughly 240 aircraft, were tasked with the defense of northern France and Belgium, while JG.1 defended the Netherlands and the northern approaches to Germany.
In the months and years to follow, Germany’s other commitments in Russia and the Mediterranean would continually deplete the Luftwaffe’s fighter strength in the west. Although outnumbered, the Germans were equipped with the new Messerschmitt Me-109F-2—the equal of the Spitfire Mk. V. While the RAF was numerically superior, the Germans held the advantage. Fighter sweeps were a nuisance and small formations of bombers a problem, but their tactical effect was minimal. The Germans had the luxury of choosing when to attack, and in fighter versus fighter combat, initiative usually meant victory.
By 1943, fighter versus fighter combat had become a cold science. Strict tactical discipline, the use of radar and the element of surprise were the main ingredients for success. But one day’s success could easily turn into the next day’s disaster. No matter how experienced a pilot became, he always lived in fear of the surprise attack—the dreaded “bounce.” Most pilots who were shot down never saw their attacker. No quarter was given at 25,000 feet, and the Channel Front became a vast graveyard for hundreds of young men.
By August 1941, it was clear that the results of the RAF’s new offensive strategy were extremely disappointing. The limited range of the Spitfire and the growing efficiency of the Luftwaffe resulted in RAF Fighter Command losing far more pilots than the Luftwaffe. RAF figures for the latter half of 1941 admit to the loss of 411 fighters while claiming the destruction of 731 German fighters. The truth was far more discouraging. In fact, the western-based German units had lost just 103 fighters—a victory ratio of 4-to-1. The Biggin Hill Wing, consisting of Nos. 74, 92 and 609 squadrons, fought well throughout the summer offensive, and Wing Cmdr. Malan increased his score to 32 enemy aircraft destroyed.
The offensive that had begun in 1941 with so much hope was scaled back. Regular offensive operations ceased in mid-October 1941, to be replaced by high-level fighter sweeps that lasted throughout the winter. In 1942, the offensive was renewed, but the RAF was shocked by the advent of a new and powerful opponent. Introduced in the summer of 1941, the Focke Wulf Fw-190A was faster than the Spitfire V at most altitudes, and it could out- dive, outclimb and out-roll the Mk. V. When it was flown against a captured Fw-190A-3, the official report stated:
General: The Fw-190 was compared with Spitfire VB from an operational squadron for speed and all-round maneuverability at heights up to 25,000ft. The Fw-190 is superior in speed at all heights, and the approximate differences are as follows:
At 2,000ft (600m) the Fw-190 is 25-30mph (40- 48km/h) faster than the Spitfire VB
At 3,000ft (900m) the Fw-190 is 30-35 mph (48- 56km/h) faster than the Spitfire VB
At 9,000ft (2,700m) the Fw-190 is 25-30mph faster than the Spitfire VB
At 21,000ft (6,400m) the Fw-190 is 20-25mph faster than the Spitfire VB
Climb: The climb of the Fw-190 is superior to that of the Spitfire VB at all heights. The best speeds for climbing are approximately the same, but the angle of the Fw-190 is considerably steeper. Under maximum continuous climbing conditions the climb of the Fw-190 is about 450ft/min (2.28m/sec) better up to 25,000ft (7,600m)
Dive: Comparative dives between the two aircraft have shown that the Fw-190 can leave the Spitfire with ease, particularly during the initial stages.
Maneuverability: The maneuverability of the Fw-190 is better than that of the Spitfire VB except in turning circles, when the Spitfire can quite easily out-turn it. The Fw-190 has better acceleration under all conditions of flight and this must obviously be most useful during combat.
When the Fw-190 was in a turn and was attacked by the Spitfire, the superior rate of roll enabled it to flick into a diving turn in the opposite direction. The pilot of the Spitfire could experience great difficulty following this maneuver, and even when prepared for it, was seldom able to allow the correct deflection. A dive from this maneuver enabled the Fw-190 to draw away from the Spitfire, which was then forced to break off the attack.
The above trials have shown that the Spitfire VB must cruise at high speed when in an area where enemy fighters can be expected. It will then, in addition to lessening the chances of being successfully “bounced,” have a better chance of catching the Fw- 190, particularly if it has the advantage of surprise.
The new offensive proved costly for the RAF. Within weeks the clear superiority of the Fw-190 resulted in heavy losses and forced Fighter Command to restrict its operations to relatively short penetrations. Casualties remained high. In January 1942, Biggin Hill suffered the loss of one wing leader, followed in April by Wing Cmdr. Michael Lister-Robinson, who was killed in combat with II/JG.26 near Le Touquet.
RAF Fighter Command soon introduced an answer to the Fw-190. In August 1942, No. 401, Squadron RCAF received the new Spitfire Mk. IX. In real terms the Mk. IX was an interim version that would serve as a stopgap counter to the Fw-190. Powered by the Rolls-Royce Merlin 61 engine, incorporating a two-speed twostage supercharger, the Mk. IX was essentially an Mk. V with revised bearers to take the new engine and modified radiators under the wings. In fact the Mk. IX’s airframe was not fully stressed for operations, but such was the urgency that it was accepted on the grounds of operational expediency. In the end the Mk. IX proved the Fw-190A’s equal. Although the numbers were small in the beginning, the Mk. IX went a long way to countering the lethal potency of the current Fw-190A-3s and high altitude Me-109G-1s serving on the Channel Front.
After the introduction of the Spitfire Mk. IX, RAF Fighter Command’s offensive operations received another boost with the arrival of the U.S. Eighth Air Force. The American four-engine Boeing B-17s and Consolidated B-24s brought with them a much-needed heavy punch, but the range problem of the Spitfire loomed as large as ever. In spite of the use of 30 imperial gallon (136 liter) external tanks, the fighter cover available to the American bombers extended only as far as the Brussels Lille-Beavais-Rouen line. Past that line, the Americans were on their own. Autumn of 1942 saw the Biggin Hill Wing engaged in “Rodeos” and in numerous escort and support roles for the Eighth Air Force.
By the winter of 1942, German military fortunes were beginning to crumble. In particular, the Luftwaffe was stretched to the limit by commitments in Russia and the Mediterranean. The depletion of theLuftwaffe in the west, just as Eighth Air Force operations began in earnest, was ill-timed. In November 1942, four Staffeln (squadrons) of JG.2 were sent to Tunisia, while JG.26 was forced to dispatch two Staffeln to the Soviet Union in January 1943.
In May 1943, Luftflotte 3 was responsible for the air defense of France and Belgium. Against RAF Fighter Command’s 100 squadrons and the growing Eighth Air Force, the Germans could muster 280 Me-109G-4s and G-6s and Fw-190A-4s (of which 75 percent were serviceable). While it was small, Luftflotte 3 was a formidable force. The pilots of JG.2 and JG.26 had a considerable nucleus of veterans who had seen more than three years of combat (German pilots did not have tours of duty; they flew until disabled or killed). Their expertise would serve them well. Their skill matched by an excellent and efficient ground control system, these hardened pilots usually fought when the initiative was in their hands. The result was heavy casualties for the Allies and few for the Germans.
The Biggin Hill Wing had suffered many losses at the hands of the pilots from JG.26 and in particular from II/JG.26, at that point commanded by Captain Wilhelm-Ferdinand “Wutz” Galland, brother of the famed Adolf Galland, general of fighters. On February 5, 1943, Fw-190 fighter-bombers attacked Hailsham. A section of No. 611 Squadron caught the fleeing Fw-190s over the Channel but was bounced by escorting Focke Wulfs of II/JG.26. The squadron’s popular commanding officer, Squadron Leader Hugo T. Armstrong, was killed by Heinz Gomann. Eight days later in a vicious rear-guard action over Le Touquet, 30 Fw-190s of Galland’s Gruppe descended on the wing, and Commandant J. H. Schloesing of the French No. 340 Squadron “Ile de France” was shot down. A month later, on March 14, Galland’s Fw-190s shot down Biggin Hill’s Wing Cmdr. Richard M. Milne (who was taken prisoner by a German patrol vessel), Commandant E. Reilhac of No. 340 Squadron and Wing Cmdr. J.H. Slater, without suffering any loss.
After that combat, No. 340 Squadron was pulled from the line and replaced by No. 341 “Alsace” Squadron. While this was happening No. 611 Squadron was reequipped with the new Spitfire Mk. IX powered by the Merlin 66 engine, producing 1,560 hp. The Biggin Hill Wing also received a new wing leader. After completing his ground tour in No. 13 Group, Wing Cmdr. Alan Deere was given command of the Biggin Hill squadrons.
Deere approached his new posting with determination and energy. This was his chance to implement his theories on wing tactics, the realization of a long-standing ambition. While Deere was responsible for the routes and timing when leading his wing, he also wanted his squadrons and sections to show a new bold initiative. He wanted a more flexible form of attack. The masscontrolled wing tactics tried during the Battle of Britain were replaced by a more fluid formation that still maintained the mutual support and discipline needed for success. One of his new initiatives was the speed and role of the escort fighter. Whenever the wing was engaged in the escort role, the speed of his Spitfires was not to be tied to that of the bombers. While it was reassuring for bomber crews to see fighters flying alongside them, they were next to useless when attacked by enemy fighters. Those were just a few of the tactics implemented by Deere.
With Deere’s posting to Biggin Hill, 17 more “kills” were needed to reach the total of 1,000 destroyed by pilots operating from the station. For a country staggered by defeats since 1939, that milestone was eagerly awaited by the British. In April the score stood at 990. On May 4, 1943, 79 B-17s bombed the Matford works at Antwerp. In support, the Biggin Hill Wing flew as second fighter cover. Over Walcheren Wing Cmdr. Deere shot down an Fw-190 from JG.26, bringing the wing’s total to 995. On May 14, the wing was in action again, this time targeting III/JG.26’s home base at Courtrai-Wevelghem. Serving as third fighter cover, the Biggin Hill Wing shot down two Fw-190s and one Me-109, bringing the score to 998.
On May 15, the weather over northern France was ideal for flying operations. Circus 297 had been well planned and was solely aimed at generating Luftwaffe fighter reaction. Circus 297 came in two parts, to be operated simultaneously. Biggin Hill was pegged for part I as fighter echelon, in which six North American B-25 Mitchells of No. 2 Group were to bomb the airfield at Caen-Carpiquet. Four Spitfire wings were assigned to provide escort and support. The way things were shaping up, the prospect of combat with elements of JG.2 seemed highly likely. The second part of Circus 297 consisted of an attack on Poix airfield, where more than 40 Me-109s had recently been spotted. Twelve Douglas Bostons were assigned to the target, to be covered by five Spitfire wings.
At 1621 hours, Spitfire IXs of Nos. 341 and 611 squadrons prepared for takeoff. Wing Commander Deere and Group Captain Malan pushed their throttles forward. Bouncing across the uneven turf of Biggin Hill, the first of 26 Spitfires clawed for air and rose into the warm afternoon sky. Hugging the ground at treetop level, the wing crossed Shoreham-by-Sea and dropped even lower, well below the electronic eyes of the German Freya radar. At 1641 hours, hidden by haze over the Channel, Deere increased power and pulled the wing into a steep climb. Now it was clear that the element of surprise had been lost. The crackle of enemy radio interference announced their presence. No. 11 Group controllers broke radio silence: “Enemy fighters gaining height…20 plus climbing towards Rouen and a further 15 plus orbiting Lisieux.”
Throttling back to maximum continuous cruise, the Biggin Hill Wing leveled off at 21,000 feet over Trouville, on the French coast. From there they headed south to their turning point over the small town of Bonnebosq. Inside their cramped cockpits, the tension grew. Alertness was the key to survival. Pilots constantly scanned the skies, checking every possible patch. Above No. 611 Squadron, No. 341 Alsace spread out into tactical fours. Final checks were made. Weapons were cocked and ready, and gunsights were turned on and adjusted for combat. Over Bonnebosq the first shouts, warnings and curses of combat could clearly be heard. The first attack came when nine Fw-190s of I/JG.2 attacked the Northholt Wing (Nos. 315 and 316 squadrons), which was flying high cover for a group of Mitchells bombing over Carpiquet. Just after bomb release the Mitchells went into a tight turn. So sudden was the course change that several of the escorting Spitfires were thrown off balance. Out of position and behind their charges, the escorting Spitfires tried to catch up. Seizing the moment, the Germans attacked from above. With engines at full throttle, the stubby-winged Focke Wulfs dived on their prey at over 450 mph.
The Polish wing was the first to fall victim. The Focke Wulfs tore through its formations, and the German leader, Captain Erich Rudorffer, swiftly dispatched two Spitfires from No. 315 Squadron. Trailing black smoke, they cartwheeled toward the patchwork quilt of farm fields below, killing Sergeant Piotr Lewandowski and Group Captain Stefan Pawlikowski—the latter a former volunteer Spad pilot with the French in World War I and a founding father of the Polish fighter force.
For the Biggin Hill Wing, some 15 miles southeast of Caen, the chances of combat seemed remote. In the distance the pilots could only watch as pyramids of flak filled the sky, and the glint and splash of sunlight from the frantically turning Fw-190s and Spitfires flashed across the sky far away. But it was not over. From below the Biggin Hill Wing two Fw-190s appeared, climbing hard from out of the haze. Leveling off at 18,000, the two I/JG.2 Richthofen pilots accelerated toward the retreating Mitchells over Caen. Their eyes fixed on the larger prize, the two Fw-190 pilots never saw the gaggle of Spitfires high above, hidden in the blinding afternoon sun— but the Biggin Hill fliers saw the Germans.
Seconds later, Deere’s laconic orders crackled over the radio, and the final act was set in motion. Yellow Section of No. 611 Squadron was ideally placed for an attack. Led by Squadron Leader Charles, Yellow Section halfrolled into a plummeting dive. Just as 611 Squadron went down, Commandant Mouchotte of No. 341 Squadron, flying at 25,000 feet, swung into a tight 180-degree turn. The move was designed to catch any Focke Wulfs that might have been split up by No. 611’s attack. The tactic worked. Just as his turn was completed, Mouchotte spotted a lone Fw-190 flying on a westerly course 4,000 feet below him. (The two incidents happened so quickly that it has never been confirmed who shot down the 1,000th.) As Charles closed on his pair of Fw-190s, Mouchotte was seconds away from his victim. Opening fire from line astern and closing from 250 to 50 yards, Charles poured cannon shells and machine gun bullets into the second Fw-190. His four-second burst produced strikes on the wings and length of the doomed Fw-190. As he flashed past the stricken Focke Wulf, he opened fire on the leader. Swinging into a tight righthand turn, the German pilot tried to escape but was met by a hail of cannon shells that exploded in his wing. Charles then broke left, and as he turned he saw a single parachute near where the first combat had taken place. Yellow 3’s leader, Flight Lt. John M. Checketts, was able to confirm both kills by Charles. The second aircraft dived straight into the ground, carrying to his death 1st Lt. Horst Hannig, commander of the 2nd Staffel of JG.2 and victor over 98 Allied aircraft.
While Charles was upping his score, Mouchotte opened fire. From 250 yards several strikes were seen on the cockpit and wing roots of his Fw-190. Suddenly the Fw-190 went vertical and exploded in midair. Then it was over.
Fighter Command claimed four destroyed Fw-190s and one damaged for the loss of two Spitfires. On the Luftwaffe side, JG.1 claimed six victories and lost four pilots that day. The Caen mission was a success, and that night the accolades and congratulations began to pour in. The prize money was shared by Jack Charles and René Mouchotte. A big party was held at the Hyde Park Hotel, and the wing asked to be stood down on the following day. That request was denied. At 1035 the next morning the Biggin Hill Wing provided top cover to No. 2 Group’s Lockheed Venturas on Ramrod 66 to Morlaix.
There would be no reprieve for the young pilots flying from Biggin Hill. To have done so would only have provided the Germans a chance to rest, and in May 1943 that was not an option.
The victories and experience gained by the Spitfire pilots flying from southern England during the years 1941 to 1943 would serve the RAF well. D-Day and the final victory in Europe would see the complete domination of the air by the Allies. This was in large part due to the young men who flew day in, day out during some of the darkest days of the war.
Donald Nijboer, from Toronto, Canada, is the author of Cockpit—An Illustrated History of World War II Aircraft Interiors and Gunner—An Illustrated History of World War II Aircraft Turrets and Gun Positions. Further reading: Focke Wulf Fw-190 Aces of the Western Front, by John Weal; and Spitfire Mark V Aces 1941-45 and Late Marque Spitfire Aces 1942-45, both by Alfred Price.
Originally published in the March 2006 issue of Aviation History. To subscribe, click here.