Even though he died in 1937, long before the summer of 1940, aircraft designer R.J. Mitchell is often described as a hero of the Battle of Britain. Indeed, his Supermarine Spitfire is considered a veritable “saviour” of the country. It’s not surprising then that when the British model company Airfix produced its first aircraft kit in 1955, it was a Spitfire. Fifty-nine years later Airfix released another Spitfire, totally redesigned and retooled for the modern modeler.
An updated masterpiece
The kit was released as a Battle of Britain–era Mk.I in early 2015. It sports a very detailed cockpit, options to show off the fighter’s eight .303-caliber Browning machine guns and no fewer than three different propellers, including the early two-bladed Aero-Products “Watts” propeller. It’s safe to say that this new Spit will be released in a number of different versions.
First bit of advice: Follow the directions. If there ever was a kit that required patience, this is it. Do the research, study the instructions and follow the steps. Carefully dry-fit parts. The fit is very good, but cleaning up parts is essential. The kit is a challenge, but the results are worth it.

A proper pilot’s “office”
Start with the cockpit. There is lot of detail here and it really needs only an aftermarket Sutton harness and seatbelts to add that nice extra touch. Paint the cockpit RAF interior green. A reddish brown color works for the seat itself and a darker leather brown color for the seat padding. Paint the control panel black and use the cockpit gauges kit decal along with a liberal amount of decal setting solution. After the decal conforms to the raised dials and switches, seal it with a coat of clear flat. Once it has thoroughly dried, highlight the appropriate switches and knobs with small bits of paint on the end of a toothpick.
The completed cockpit becomes a separate assembly, a “tub” that fits between the fuselage halves. Delay gluing the cockpit in place so it can be adjusted to fit into fuselage. Set the completed section aside and it’s time to move on to the Spitfire’s famous elliptical wing.
The kit has the option to show off the fighter’s eight machine guns. Cut away the gun access panels along the top of the wing and the small doors underneath, where ammunition boxes would have been loaded. The panel covers are included as separate pieces. Paint the machine gun breeches gunmetal and the ammunition boxes aluminum.

Once the weapons bays are complete it’s almost time to finish assembling the wing. Airfix has engineered an interesting way of attaching the landing gear. Two pieces (parts C-30 and C-31) serve as posts where the rest of the landing gear will be attached later. It’s a unique way of making sure the fighter sits correctly on its landing gear when finished. Assemble the wings, clean up and sand the edges and attach the ailerons. As separate pieces, they can be posed in a more natural position.
Recommended for you

With the wings completed, it’s time to bring it all together. There will be some minor filling and sanding. Add the underwing oil filter pieces, engine air intake, horizontal stabilizer and rudder. Time for paint.
Invest in a set of camouflage paint masks. The adhesive vinyl masks are inexpensive and easy to use. AML Accessories from the Czech Republic has a wide range of Spitfire masks that make for a “proper” RAF camouflage pattern. Having chosen the markings that will be applied later, check to see which of the patterns—simply called “A” and “B”—are to be used. These official patterns are mirror images of each other made up of dark earth (FS30095) and a medium to dark green (FS34079).
Historic inspiration
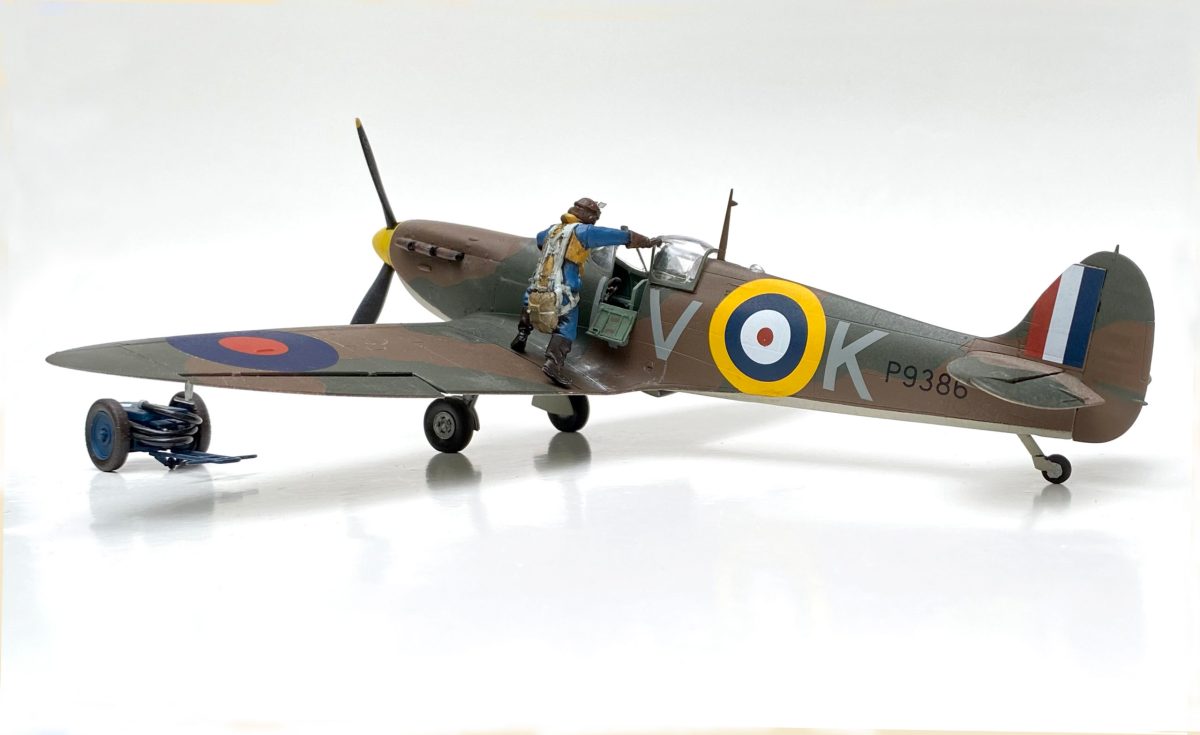
This Spitfire (P9386) will be displayed in the markings of Brian Lane, commander of No. 19 Squadron. By the late Summer of 1940, many fighters had their undersides painted a simple solid color sometimes called “sky type S,” a sort of pale bluish green (approximately FS34583).

Once the painting is complete, spray an overall clear gloss and set the model aside to dry. Use this time to assemble the landing gear, tail wheel and engine exhaust shrouds. Mask and paint the canopy pieces as well.
Squadron Leader Lane’s Spitfire sported a bright yellow spinner, said to be a holdover from when the airplane had been part of a flying training unit. Paint and assemble the spinner and propeller, then set it aside. EagleCals decal sheet EC157 is a great set of markings for four different Battle of Britain Spitfires, including Lane’s Spitfire Mk.I, marked with the squadron code letters “QV-K.” Lane was credited with shooting down a Messerschmitt Me-110 in this aircraft on September 7, 1940. A seven-victory ace, he was known as an exceptional leader. Unfortunately he would be reported missing on December 13, 1942, last seen chasing two Focke-Wulf Fw-190s.
Carefully begin the process of adding the markings to the aircraft. A small amount of setting solution makes the decals conform to every rivet and panel line, helping create the look of having been painted on. Add some light weathering, some wear to the metal, especially along the left wing root where pilots scrambled into their aircraft. A few oily streaks underneath, a bit of exhaust staining and this Spitfire has the look of a busy British defender.

Now carefully attach the landing gear using the posts on the wing assembled earlier, taking care to make sure they have the proper angle. This Spitfire will be shown with the left-side crew entry door opened to show off all that cockpit detail. The kit-supplied door is one of the few pieces lacking detail. An aftermarket resin door from Ultracast is the perfect solution. The selection of clear canopy parts includes canopies for a number of different Spitfire marks. The clear parts are crisp and very clear. Be sure to pick the right canopy and add the rest to your parts box.
With the canopy, landing gear and radio antenna attached, Lane’s Spitfire is ready to take its place alongside your collection of Battle of Britain combatants.