
The perennial pickup truck (or should that be “lorry”?) compared to the sports car fighter (the Supermarine Spitfire), the Hawker Hurricane performed much of the heavy lifting during the Battle of Britain. Despite its beefy look and thick wing, the fighter was actually nimble enough to turn inside the Messerschmitt Me-109E. Within that wing, the Hurricane’s eight .303-caliber machine guns were set close together, providing a concentrated field of fire. The power of those more focused weapons made it the fighter of choice to attack German bombers.
Like its stablemate, the retooled 1/48th-scale Hawker Hurricane from Airfix is full of detail. The model has a superb replica of the airplane’s tubular interior construction and a more accurate representation of the cockpit’s open floor. As with the Spitfire model, a Sutton harness is all that’s needed to spruce up the finished cockpit. Paint the tubular structure an aluminum color and the inside wall of the cockpit RAF interior green. The completed cockpit is attached to a “box” formed by wing spars that also encompasses the interior bay of the landing gear. Paint these pieces natural aluminum.
Be careful in building the tubular “cage” that surrounds the seat and control column, as the fit needs to be spot on. Dry fit, measure and sand pieces accordingly. A good fit here will be important in bringing the wing assembly and the fuselage together. Use the kit-supplied instrument panel decal against piece D16. A liberal amount of decal solution helps it conform to the piece and adds detail to the completed cockpit.

With the fighter pilot’s office complete and attached to the lower wing, it’s decision time. Similar to its Spitfire kit, Airfix has given the modeler the option of opening up the weapons bays to show off the Hurricane’s complement of eight machine guns. If you decide to go that route, carefully follow the instructions to cut away the appropriate areas in the upper wing halves. Install the machine gun breeches and ammunition boxes and bring the wing halves together.
Attach the two fuselage halves and cement it to the wing assembly. The fit is tight so testing is a must. Complete this stage by adding the separate lower aft section of the fuselage. A bit of filler and some sanding and the basic shape of the airplane is complete. It’s almost time for paint.
Assemble the horizontal stabilizers and attach them, the rudder and ailerons to the fuselage and wings. These pieces are supplied as separate parts; attaching them with a slight droop can give the finished model a more natural look of an aircraft at rest.
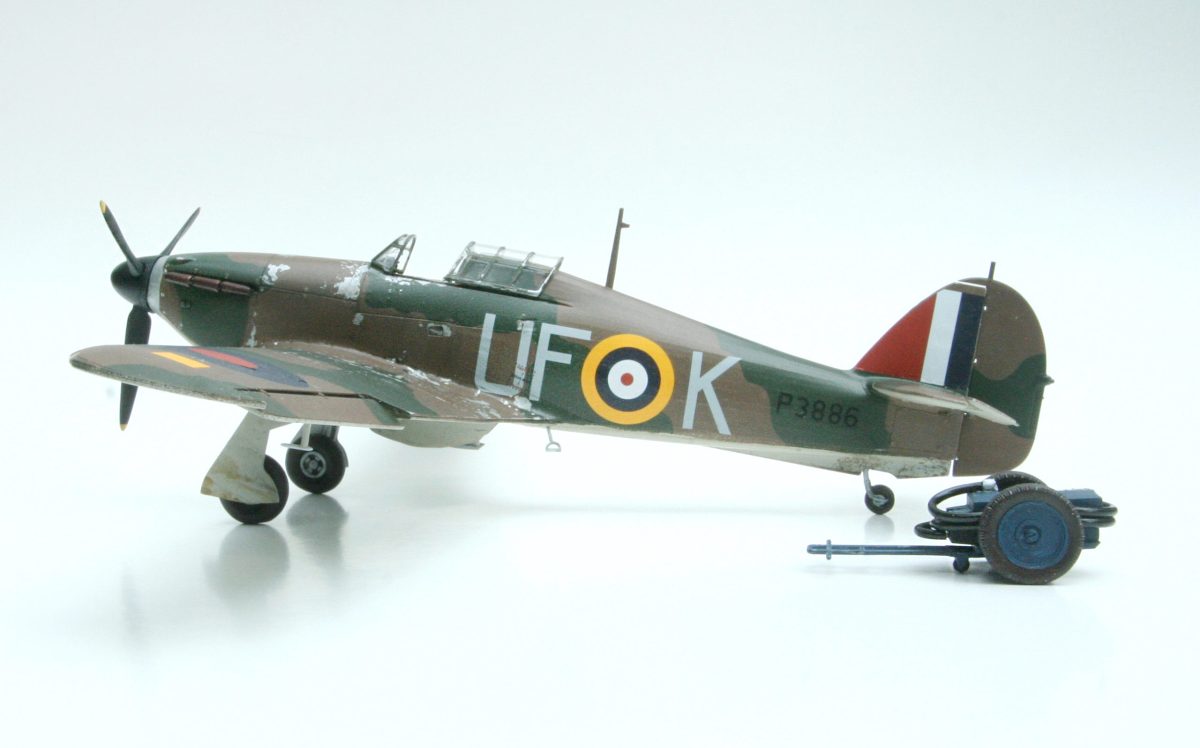
The underside of the Hurricane should be painted in the RAF standard “sky type S” color, best described as a pale green-gray. Upper surfaces are painted with a pattern of RAF dark green and dark earth. Choose the particular pattern (“A” or “B,” mirror versions of each other) that matches the markings chosen for your Hurricane.
Photos show this particular Hurricane as well worn with some of the camouflage worn down to natural metal. Paint an aluminum color on areas where there’s the most wear. Use lightly thinned rubber cement as a “liquid mask.” After the rest of the camouflage has been painted, remove the bits of rubber cement with a toothpick to reveal the silver color underneath. Using the toothpick and a fine brush, add smaller flecks of paint to complete the worn look of a combat veteran.

Next, put together the landing gear and propeller. By 1940 the Hurricane sported two distinct types, the variable-pitch de Havilland or a hydraulically powered constant-speed Rotol prop. Check your reference material to find out which version to use. Airfix has included pieces for both, one for the model and the other for the parts box.
Aeromaster’s “Yanks in the RAF” decal sheet no. 48-577 has markings for a Hawker Hurricane Mk.I from No. 601 Squadron, flown by Flag Officer Carl Raymond Davis. An American educated in England, Davis joined the Royal Air Force’s Auxiliary Air Force in 1936. On August 18, 1940, while flying this particular Hurricane he shot down two enemy aircraft and shared in the destruction of a third. One of eight American pilots to fly during the Battle of Britain, Davis was shot down and killed on September 6, 1940.
With decals applied and a coat of clear flat varnish, attach the landing gear, propeller and the clear cockpit canopy. Last but not least add a bit of grime, oil stains and mud to mimic the rough airfield conditions at RAF Tangmere in Sussex. Your Hawker Hurricane is ready for the next scramble!