In the closing days of World War II in the Pacific, it was not uncommon to hear U.S. Army Air Forces radar operators on Okinawa mutter: “Forget it! It’s a ‘Frank.’” The technicians knew that the fast-moving blips they were watching were Nakajima Ki.84 Hayates on their way to intercept squadrons of Boeing B-29s. It was customary to scramble flights of North American P-51s to protect the bombers, but sometimes even the Mustangs were unable to catch the swift Japanese fighters.
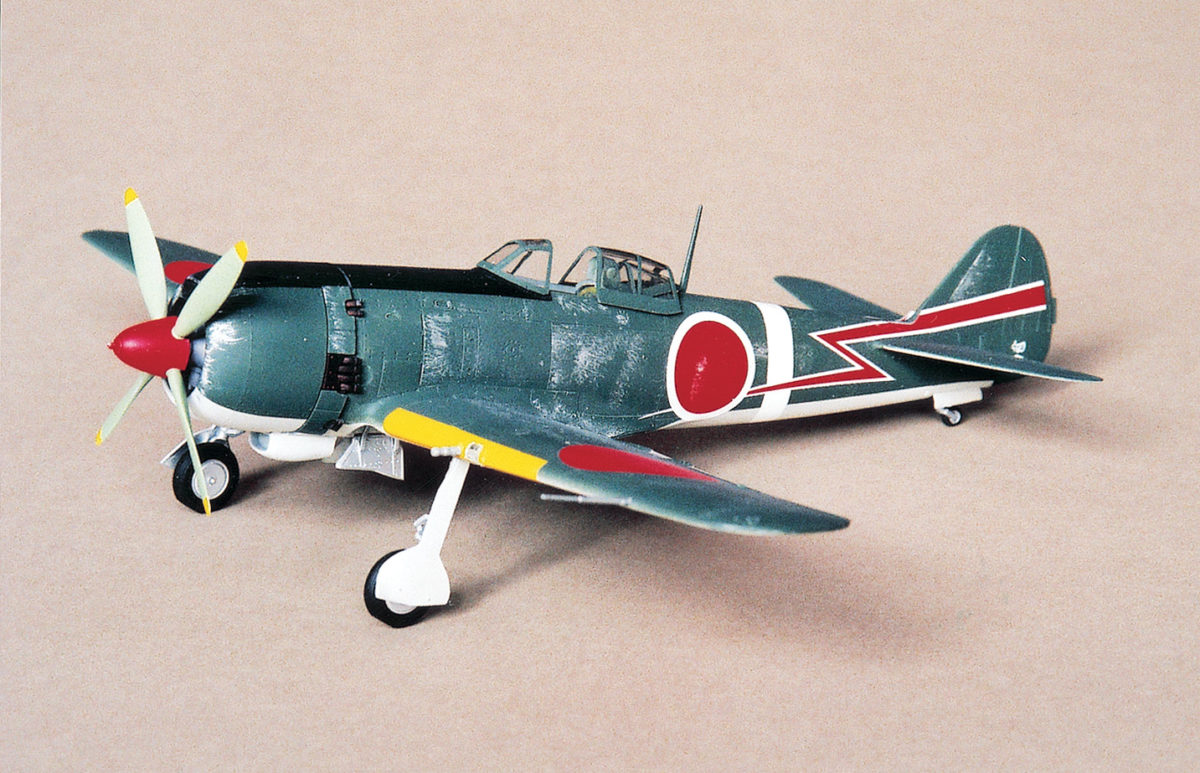
Flying a Ki.84 from Saigon, Indochina, in January 1945 was Warrant Officer Officer Yojiro Ohbusa, a 19-victory ace of the 1st Chutai, 50th Sentai. The new Hasagawa 1/48th scale version of the Ki.84 is a good replica of his fighter.
Construction starts with the assembly of the more than 20 parts that make up the cockpit. The instructions call for the base color to be “metallic blue green” or aotake. However, many experienced Japanese WWII modelers disagree, indicating that the cockpit should be a pale green, which is a close match to FS-34258. Interpretations of black and white photos from the war years have yielded that both colors were found, with some cockpits also left in bare aluminum.
The instrument panel is flat black, with several of the levers and knobs picked out with dots of red, black and white. Belts made from strips of paper painted light brown finish the seat and will add interest to the “front office.” The completed cockpit should then be trapped between the fuselage halves and set aside to dry.
The wing-to-fuselage assembly seam has always been one of the most difficult to resolve in modeling. No matter how well the kit is engineered, there will always be a joint here that needs filling. However, first fitting the top wing pieces to the fuselage and then applying glue from the underside reduces that seam to a minimum and gives a near perfect fit. Attach the bottom wing pieces after the tops have dried solid. The horizontal stabilizers and rudder are next fitted and cemented into place.
The 1,900-hp Nakajima Homare Ha-45 engine should be glued together and painted with Model Master’s “buffing steel” and the exhaust stubs sprayed with “burnt iron.” The engine should be “washed” with a very thin coat of black to bring out the details. Set the completed 18-cylinder power plant aside. Attach the engine cowling with dabs of white glue. You will attach it permanently, with the engine inside, during final assembly.
Ohbusa’s Frank was painted in Imperial Japanese Army light grey undersides, FS-36622, and IJA dark green, FS-34092. The markings for his aircraft can be found on Sky Models decal sheet, #48-041. These decals are very thin and require careful application. They should be “floated” into place using an artist’s brush and plenty of water.
There are two versions of Ohbusa’s Hayate to choose from on the sheet. Color profiles of both aircraft can be found in Osprey’s Japanese Army Air Force Aces 1937-1945, by Henry Sakaida.
The dark-green topside paint peeled and chipped very badly due to hard wear and wartime deficiencies in the closing days of the Pacific conflict. You can duplicate this effect by one of two methods. The first requires undercoating the model with silver and then over-painting the topsides with dark green. When dry, lightly dab the areas you want to show wear with masking tape. This will “chip” the paint and expose the aluminum, much like it did in reality. The technique requires a light touch.
The second method is to paint the aircraft’s topside with the base color. When it is dry, overcoat it with a clear sealer. Mask off wear sections and then brush streaks of silver paint starting from the corners of the taped “boxes” into the direction of the slipstream. Both methods work well and will give the impression of wear and peeling of the camouflage color.
Another area of controversy is the color of the Frank’s propeller. Some were left in natural metal, some were light green and still others were brown. Ohbusa’s aircraft appears to have had a light-green prop with yellow tips. The spinner was bright red to match the lightning bolt marking that ran from the rudder to the wing root.
With the painting complete, attach the engine to the fuselage and snap the cowling over it. Attach the landing gear and the canopy, and your model of Warrant Officer Ohbusa’s Ki.84 will be ready for display.
Originally published in the May 2006 issue of Aviation History. To subscribe, click here.