
Anyone who has seen the epic D-Day film The Longest Day has surely been impressed by the images of hundreds of Douglas C-47s rolling down runways and taking off with troops to be dropped into France in the opening hours of Operation Overlord. C-47 kits are produced in all sizes, with one of the most popular in 1/72nd scale coming from Italeri, No. 127. The completed model has a wingspan of just over 16 inches and fits nicely on most display shelves. It also features markings for a D-Day Skytrain, which partners with our feature, Sitting Ducks Over Normandy, an interview with C-47 pilot Russell Chandler III.
The model has a complete interior that should be painted “green zinc chromate.” There’s also a full cockpit with flight crew seats, dual control yokes and an instrument panel. Don’t spend too much time here, since most of this detail will be hidden when the fuselage sides are cemented together.
The instructions next call for the placement of all cabin and cockpit windows. Skip this step, as we’ll handle it later. However, you will have to decide whether the cargo door will be displayed open or closed at this time. The small troop door, part of the large cargo door, must be inserted from the inside. With the door installed, cement the fuselage sides together.
The upper and lower portions of the wings are next in the assembly process. On my kit, the engine nacelles required some sanding and filling to get a clean joint. While the wings are drying, assemble and paint the two Pratt & Whitney R-1830 engines with Model Master’s “gunmetal.” Trap the engines inside the left and right cowlings and set them aside to dry. Next paint the propellers flat black, but hold off on attaching them to the engines until all the painting is complete.
The horizontal stabilizers can next be assembled and glued to the fuselage. The next step is to dry fit and then carefully glue the center wing piece into place on the underside of the fuselage. Make sure this part fits squarely, or you will have problems with the next step, attaching the outboard sections of the wings. You’ll probably need to use a small amount of filler where the wings meet the fuselage.
At this point check your references and determine which type of carburetor air intake scoop was used on your version of the aircraft. Note that the kit provides three types.
With the major construction finished, check over your work, then fill and sand any seams that are visible. A coat of light gray primer will highlight any areas that need attention.
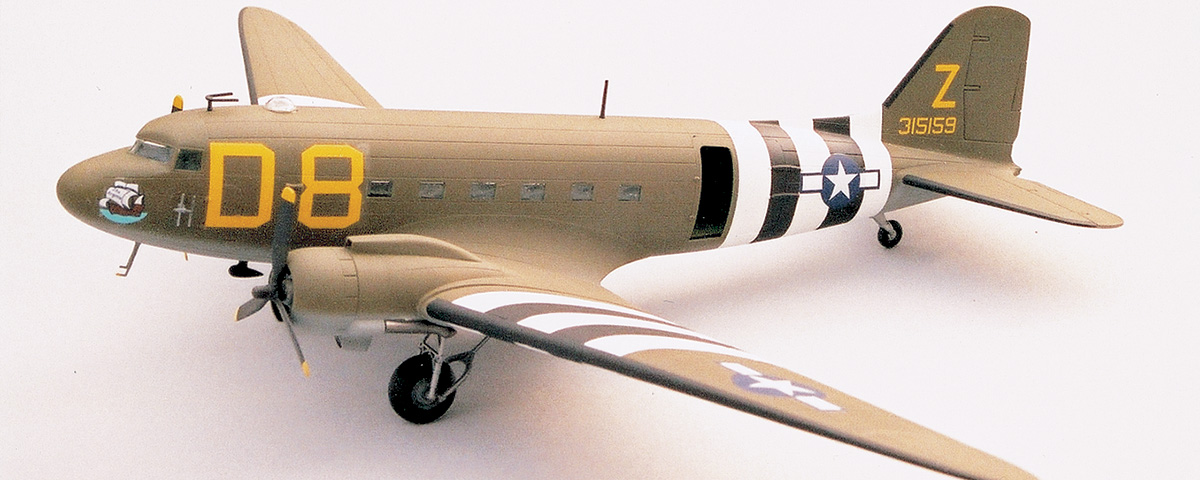
D-Day C-47s had olive-drab, FS-34087, topsides and neutral gray, FS-36270, undersides as detailed in the Squadron Signal publication C-47 Skytrain in Action. Using photographs of real aircraft, I was able to determine where to place the black and white invasion stripes that were applied for D-Day operations. Using panel lines as a reference, I painted entire sections to be striped with insignia white, FS-37875.
When the surface was dry, I used a pair of dividers to mark off the areas to be painted black. Tamiya brand 6mm-width masking tape is ideal for this task. Masking and painting the stripes is a tedious process, but the finished product adds considerable interest to an otherwise drab color scheme. When the stripes are dry, mask off the de-icing boots on the leading edges of the wings, horizontal, and vertical stabilizers and paint them “aircraft interior black,” FS-37031.
With the painting complete, give the model a coat of Testor’s Glosscoat or Johnson’s Future acrylic wax to give the decals a smooth surface to adhere to. The kit decals have a thick carrier and require a thorough soaking in water so that they will release from the backing paper. You’ll also have to use one of the decal softener products to get them to lie down over the panel lines.
The kit decals offer markings for an aircraft flown by Colonel Charles H. Young, commander of the 439th Troop Carrier Group, which dropped men from the 101st Airborne on Ste. Mère-Eglise early on the morning of June 6, 1944. A painting by Tony Eubanks of Colonel Young’s aircraft appears on the dust jacket of the book Into the Valley.
When the decals are dry, give the entire model a spray of Dullcoat to seal the paint and markings. Then glue the landing gear and all the radio and navigational equipment antennas into place. Complete your model by filling the windows with MicroScale’s Krystal Klear, a product that looks like white glue but dries clear.