
The B-17E was the first of the “combat-ready” versions of Boeing’s four-engine heavy bomber. But even though it was bristling with defensive firepower, the Flying Fortress was already vulnerable to enemy fighters when the U.S. entered the war.
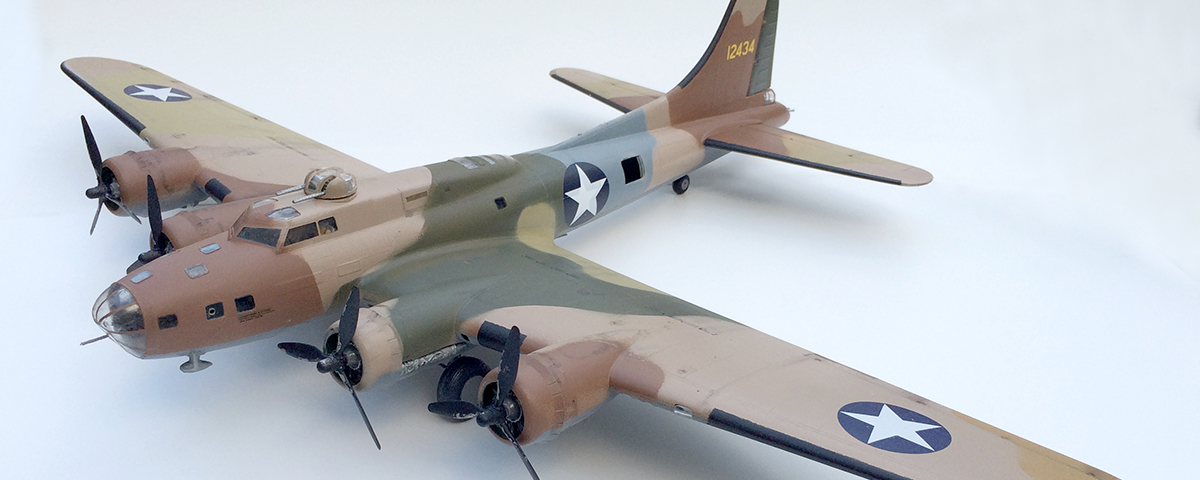
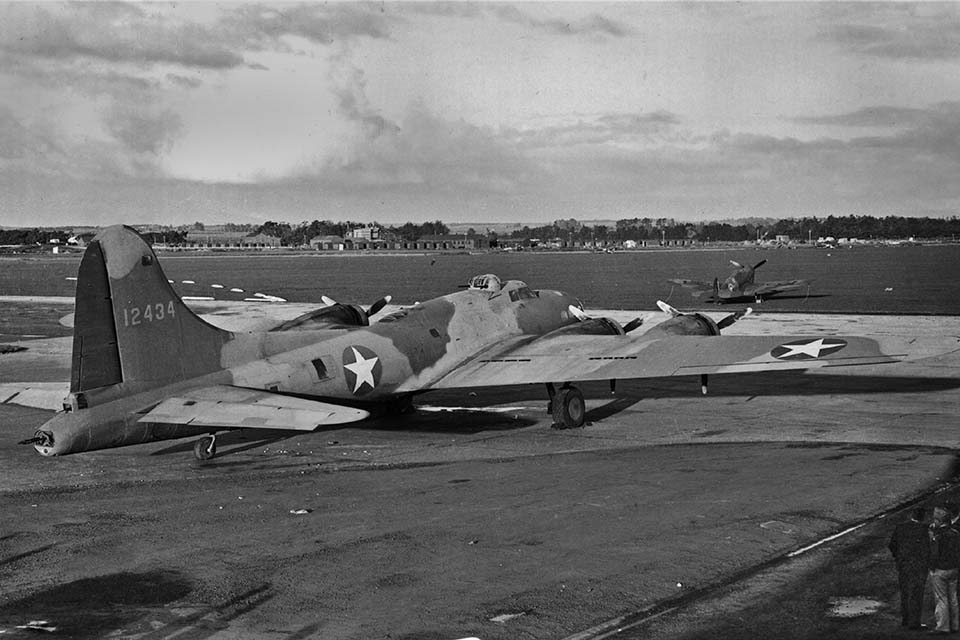
In Aviation History’s May 2016 issue, author Steve Birdsall chronicles the service records of eight of those early bombers, the B-17Es that flew into combat “unarmed and out of gas” on the morning of December 7, 1941, at Pearl Harbor. Their baptism of fire is an exciting tale, but Birdsall focuses on the rest of the story. In the frantic days after the Japanese attack, a unique camouflage pattern was applied to the bombers that has come to be called the Hawaiian Air Depot scheme. Our build will be one of those Forts, serial no. 41-2434.
Revell released a B-17F in 1/48th scale in 1974. Nicely detailed for its time, it was popular in its markings as the famous Memphis Belle. Monogram’s 1/48th B-17G was one of a series of larger bombers the company produced that were state of the art for engineering and detail in the late 1970s. We’ll combine the detail of the Monogram kit and the basic earlier shape of the Revell, add some aftermarket parts, do a bit of scratch building and backdate the bomber to depict 41-2434 as it appeared in late 1942.
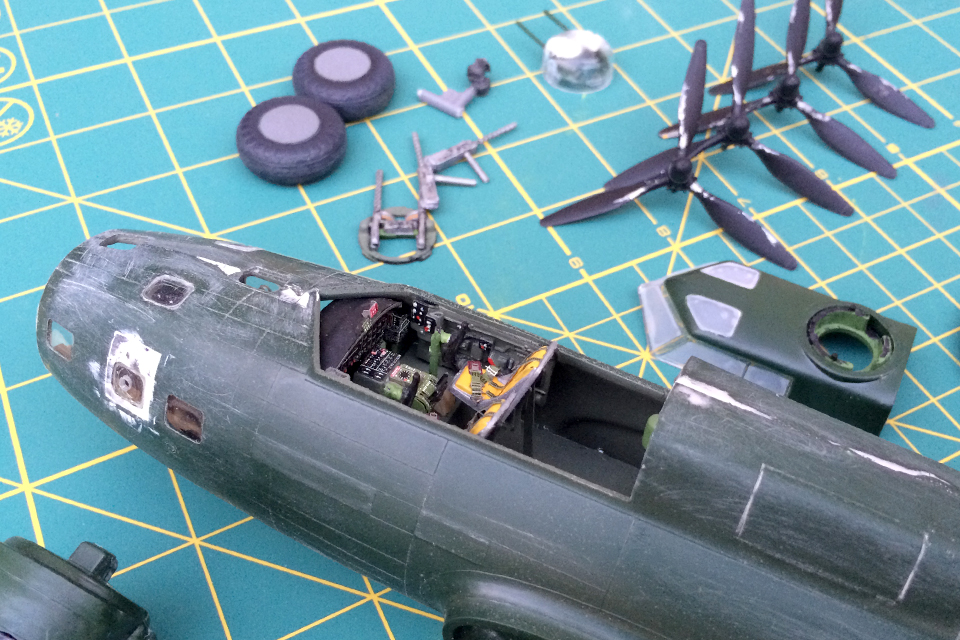
Two of the most noticeable differences between the B-17E and later versions are the smaller windows along the forward section of the fuselage and the greenhouse-style bracing of the nose, which creates a slightly blunter profile. A tenacious online search turned up a vacuformed nose. The smaller windows take a little work, involving filling the larger space and measuring the area to be drilled out. While the filler dries and between sanding sessions, I started detailing the cockpit, using an etched-metal detail set.

Our B-17 was one of a number of aircraft equipped with a Sperry remote-controlled ventral turret instead of the more familiar ball turret. A turret from another kit in my stash (an Academy B-25B) matched the size and shape we need. I added a little scratch-built detail to the waist positions and also installed nicer-looking Monogram .50-caliber machine guns.
With the cockpit looking good, it’s time to assemble the fuselage and wings. Both these kits are more than 30 years old, and accurate fit was never their strong suit, so your filling and sanding skills will definitely be put to the test. After you’re done with the fuselage and wings, check the fit, get it all together, and fill and sand a bit more. While the filler dries you can paint and detail the engines—then sand and fill some more.
Once the engines are in place and cowlings are on, it’s time to reproduce the color scheme that makes this B-17 special. Patience is key as you mask off the areas for painting. I usually start with lighter colors and progress to darker ones. Success depends on taking your time while masking, remasking and getting those colors just right.
While there’s much debate about exactly which colors were used at the Hickam Air Depot, the standard neutral gray underside remains the same, along with the huge “U.S. ARMY” marking we’ll add later. Historians have tried to assign FS numbers, the Federal Standard numbers given to the colors used on military aircraft, to the other hues we’ll use. Author Birdsall and illustrator Jack Fellows have come as close as anyone to nailing down just what paint was used in the frantic weeks after the attack. All these colors would have been painted over the stock olive drab, OD-41. I started with the lightest hue, a medium color between tan and gray (approximately FS 36424), followed by an almost bleached version of olive (FS 30277), a reddish-brown color that seems to be close to FS 31090 and a curious blue-gray color around the waist section of the fuselage (FS 15189).
All of this was meant to break up the shape of the aircraft on the ground, hopefully keeping Japanese fighters guessing during a strafing run. I’ve tried to depict this bomber as it might have looked after the garish red and white stripes on the tail and red center of the national insignia were painted out, all the while keeping in mind that the bomber’s appearance changed as it sat in the weather at airfields in Australia and New Guinea. TLAR (That Looks About Right) is as good a guide as any at times like this.
After cutting mask upon mask using what seemed like an entire Sunday edition’s worth of newspaper, I began masking, spraying, masking again and, most important, waiting for the different colors to dry. With the painting complete, I ran very fine grit sandpaper over the whole airplane to help even out the finish and distress it just a bit. An overall gloss coat prepares the surface for decals. While 434 never had a nickname or any nose art, it did have the national insignia in all six positions (the sides of the fuselage as well as the tops and bottoms of both wings), and that huge U.S. ARMY marking across the bottom of the wing. There’s also the all-important tail number, 12434 (the first 4, indicating the year the aircraft was part of the budget for that fiscal year—1941—is left off). There were additional markings, notes that let the crew know where fire extinguishers are located, or where a life raft would be stored. These areas would have been painted around, leaving a small patch of the original airplane’s color.
Next it’s time to break out the pastels, and your various shades of “engine oil,” “grime,” and “been out in the sun too long” (not sure what FS color number that last one is). It may be the hardest part of a project like this to know where and when to stop weathering. I’ll leave it to you and your own set of TLAR goggles to decide.
Now its time for the little things: Peel away the masking on the nose, gun turrets and windows. Carefully add the waist guns and the radioman’s .50-cal. Then install the upper turret, that Sperry ventral turret, an antenna or two—and maybe add a bit more weathering. Your Fort is finally ready for a dusty Port Moresby airstrip.