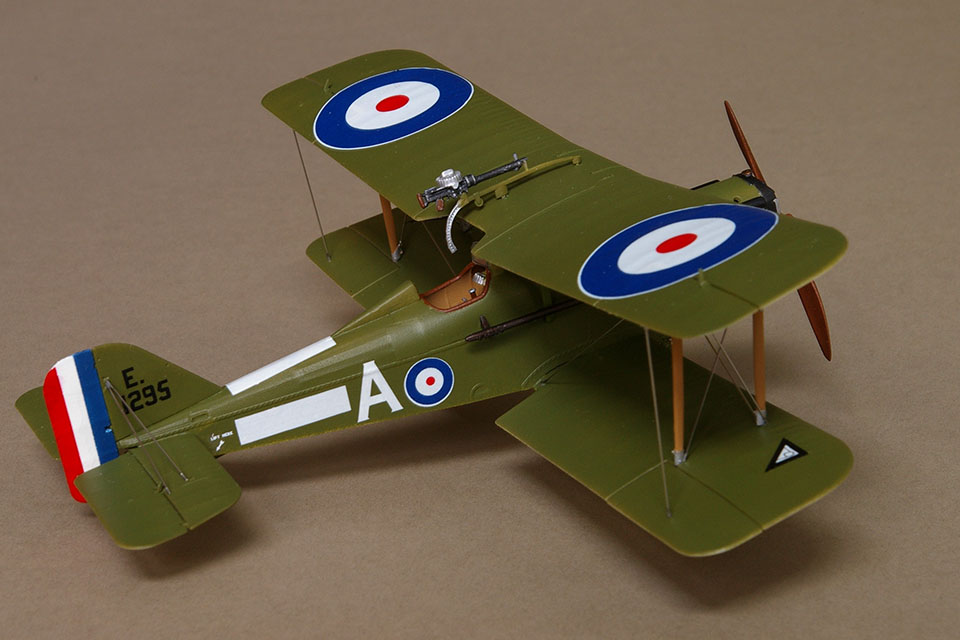
The Royal Aircraft Factory S.E.5a was considered superior to any German aircraft over the trenches from the fall of 1917 until the Fokker D.VII began opposing it in May 1918. What gave the British fighter its edge was a redesigned upper wing and the newly introduced 200-hp Wolseley Viper engine (a replacement for the S.E.5’s 150-hp Hispano Suiza). Roden’s 1/48th scale kit features the markings carried by Britain’s number two ace, Major Edward “Mick” Mannock.
Construction starts with painting the inside fuselage sidewalls with Poly Scale’s “clear doped linen.” (Roden’s instructions call for this area to be painted “natural wood,” but this is incorrect.) The instrument panel should be painted Model Master’s “wood,” with additional parts of the cockpit picked out in flat black and silver. The completed cockpit parts need to be finished with a wash of dark brown to simulate wartime wear. Brush the seat with “leather,” and then dress it up with belts made from paper strips dipped in black coffee and, while still wet, draped over the frame for realism.
Spray the Viper’s radiator gloss black and pick out the cooling shutters with Floquil’s “bright silver.” A dot of brass paint on the radiator cap finishes this subassembly, which should be set aside to dry. Glue together the multipiece landing gear and paint in “British brown drab,” PC-10. Brush the tires with British “dark sea gray,” not black. (World War I rubber was not dyed with lampblack.)
Trap the finished cockpit into the fuselage and glue the right and left sections together, making sure the floor is level. Attach the upper forward section of the fuselage, cylinder head covers and radiator. You can also glue the horizontal stabilizer, elevators and lower wing pointing position on the fuselage at this point. Paint the underside of the fuselage and the lower wing using Poly Scale’s clear doped linen. Next paint upper surfaces with PC-10. When the paint is dry, flip the partially assembled model over and attach the landing gear subassembly with white glue.
Set the model aside and let the landing gear dry thoroughly. Then paint the upper surfaces of the top wing with PC-10 and apply clear doped linen to the underside. Set it aside to dry. Remove and clean up all the wing struts from the modeling sprues. Paint the cabane struts with PC-10 and the interplane supports with wood. Note the steel “collars” on the top and bottom of each interplane strut, which should be brushed with silver. Apply a coat of Future floor wax on the model to provide a smooth, glossy surface for the decals. The Roden kit, No. 416, provides all of the markings for Mannock’s aircraft as it looked in April 1918. The kit decals are somewhat thick and need extra soaking in warm water before they will release from their paper backing. You’ll also need to use a softening agent, such as Super Sol extra strength decal setting solution, to allow the markings to settle neatly over the kit’s raised details. Discard the decal rudder stripes, which don’t fit properly. Instead, paint the entire rudder insignia white (FS-17925), and when it’s dry, mask and paint equal-width stripes of insignia red (FS-31136) and true blue (FS-15102).
Glue the interplane struts to the bottom wing with white glue. When those are dry, flip the model over and position and glue the top wing onto these struts. Support the wing with paint bottles until the adhesive has set up. You can now cement the cabane struts into place.
The S.E.5a boasted a lot of rigging wires. Re-creating those requires a steady hand and patience. Several products can be used to rig biplanes, but I think the best option for this job is Minimeca (Ref. 107) .3 X 250mm stainless steel wire. Use a pair of draftsman’s dividers to measure the wires before cutting. Last, cut out and attach the acetate windscreen to the front frames of the cockpit. Your S.E.5a is now ready for display.