Airfix of England’s 1/72nd scale B-24J/Mk.VI Liberator kit was first released in 1963. While several other model companies have produced more modern examples, this kit will test your skill in building a replica from the “early days” of modeling.
Airfix has upgraded and retooled many of their releases in the past few years; this is not one of them. It is important to approach this model with plenty of patience and filler putty. The cockpit is painted overall flat aircraft interior black, FS-37031. Some sources indicate that the cockpits were, on occasion, RAF interior green, a color very close to FS-34227.
Airfix provides two seats for the flight crew and a pair of elliptical control columns. Little will be seen once the greenhouse canopy is cemented into place however a small amount of detail can be added with an instrument panel decal and some paper seat belts. A couple of odds and ends from the decal spares box will add enough detail to add interest..
The instructions then call for the building of the gun turrets however only the top turret base is installed in the fuselage at this time. Next the completed cockpit and the nose gear well are cemented into the forward portion of fuselage. To keep this model on its tricycle landing gear, white glue a number of BBs behind the cockpit bulkhead.
While the BBs in the fuselage are drying, it’s time to tackle the wings and the empennage assemblies. Model kits in the 1960s customarily had movable tail and wing control surfaces. Assemble the ailerons, elevators and twin rudders. These parts will need cleaning up with a light sanding as they have quite a bit of molding flash. Also it was common for the wings and fuselage to be covered with rivets that were out of scale. This problem can be remedied by light sanding the wings and fuselage until the rivet pattern is barely visible.
Paint the main wheel wells RAF interior green, brush the main gear legs silver and glue them into place. Trap and glue the ailerons into the wings and then cement the top and bottom wing parts together. Clamp the wings together with spring clothespins or wide strips of masking tape.
When the wings are dry, fit them into the cutouts in the fuselage. The tabs on the wing-to-fuselage sections will have to be trimmed to fit. Sand and in some areas reshape the engine cowlings before cementing them to the wings.
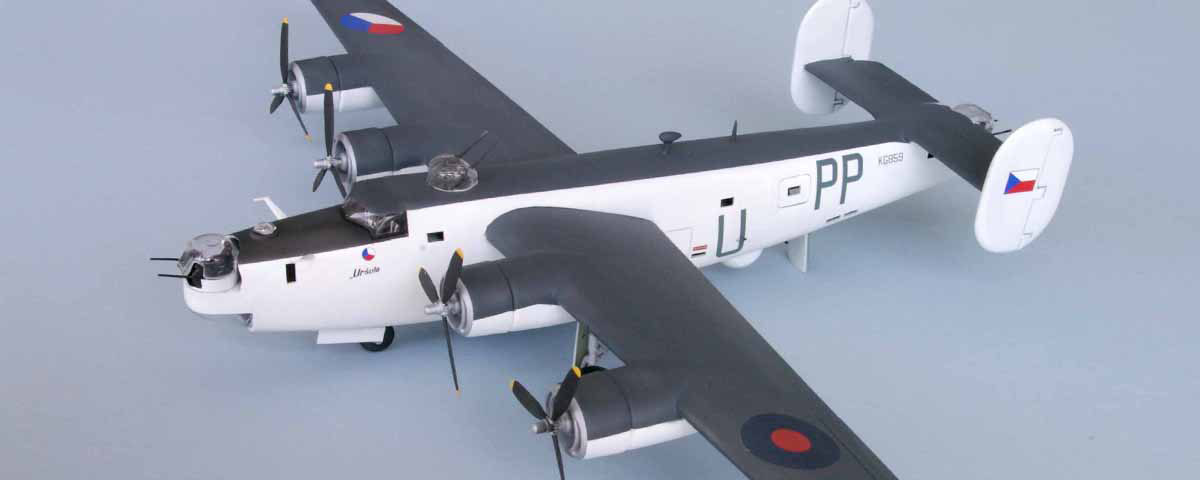
Illustrations from the Revi decal sheet #72-003, Czechoslovak Liberators, show B-24J/ GR Mk.VI (KG-859) with the underside ball turret removed and replaced with an anti-submarine radar antenna dome.
Cover the hole left in the fuselage with sheet plastic. After fitting the ball turret cover, glue the fuselage parts together. Fill and sand the joints and then spray a coat of primer to highlight any surface flaws.
The gun supports in the tail and nose turrets will need scratchbuilt mounts to replace the figures from the kit. The mounts are made from plastic rod and strip painted flat black, (FS-37038.) The clear turret parts require sanding to fit and are then dipped in Future floor polish to return their clarity.
With the basic construction of the model kit finished it is time to turn to painting. Czech Coastal Command sub-hunters from 311 Squadron were first flown by RAF 547 Squadron. These B-24J/Mk.VI aircraft carried the standard camouflage of flat white (FS-37865) on the fuselage sides and gloss insignia white, (FS-17875,) on the wing and tail surface underside. The wings, fuselage tops and horizontal stabilizers were British Extra Dark Sea gray.
The sharp contrasting camouflage colors will take careful masking in order to get clean demarcation lines A clear gloss spray is all that is needed to give the model a smooth surface for the markings. Attach the clear parts with white glue and your B-24J/Mk.VI Liberator is complete.