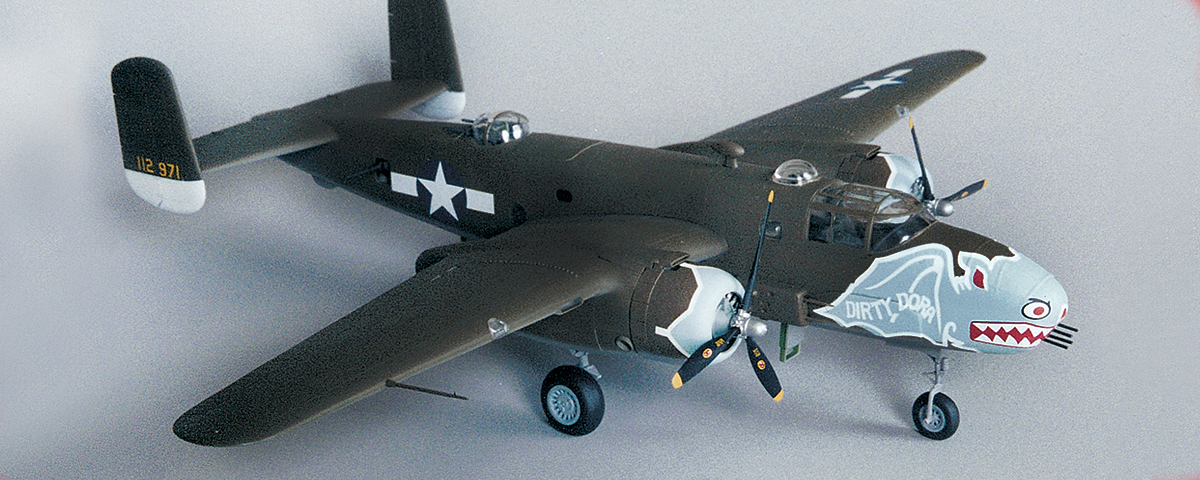
The C and D versions of North American Aviation’s B-25 bomber were probably the most modified of all the glass-nosed Mitchells flown during World War II. Generally, the aircraft left the factories as basic B-25s and were modified at the repair and maintenance facilities spread around the Pacific and North Africa.
Our subject is a B-25C in 1/48 scale from Accurate Miniatures. Although the company is now out of business, some of its kits can still be found in model shops. The B-25C kit is unusual in that all the masking and modifications to produce an accurate model of Dirty Dora are contained in a single box. Note, however, that Accurate Miniature kits are designed for experienced modelers.
Construction starts with building a fully detailed interior, right down to the chemical toilet. The cockpit area is painted a medium green, FS-34092, the bomb bay is flat aluminum, FS-17178, with the rest of the interior painted chromate green, FS-33637. Unfortunately, most of these great details will be hidden when the right and left fuselage parts are closed. Only the cockpit is readily visible once the model is completed.
Before closing the fuselage sides, be sure you have painted and secured the top turret and its mount into the fuselage floor. Do not attach the clear turret blister at this point or you will have a difficult time when painting the fuselage. Dirty Dora carried a variety of ordnance. I “loaded” two 1,000-pound bombs and glued them in the bomb bay before closing the fuselage.
The aircraft in this kit had a standard B-25 glass nose. This clear nose will be painted over in the final phase of the construction. After mounting the two sets of twin .50-caliber machine guns in the forward glazing, glue the remaining nose parts together.
The instructions next call for the installation of the nose landing gear leg, but I delayed this step until later because the leg is very thin and fragile. The instructions provide paper templates to fabricate the fuselage and top turret gun blast shields from plastic sheet. Attach them to the correct places on the fuselage, but hold off on cementing the fuselage gun packs until later.
Before cementing the completed clear nose to the fuselage, secure the brass nose weights into the section in front of the cockpit. Carefully align the clear nose to the fuselage and glue it into place.
The twin tails, wings and engine nacelles should next be assembled and glued to the fuselage. The engines should then be assembled but not placed into the cowlings at this time. I painted the inside of the cowls light gray. The topsides of the cowls are painted olive drab, FS-34087, and the undersides neutral gray, FS-36270, with a soft demarcation line between the colors.
There are a few places that will have to be filled and sanded at this point. Attach the cockpit glazing with white glue to the fuselage and then mask the clear areas with the vinyl masks provided in the kit. When you are satisfied with all the seams and construction, paint the topside of the entire aircraft olive drab and the underside in neutral gray, with a soft demarcation line.
Allow a day or two of drying time before applying the nose and cowling masks. These masks are a bit tricky to apply, but a little water with a drop of dishwashing liquid will make the job easier. Paint the area on the forward portion of the nose and the cowlings light blue, FS-35190.
As soon as the painting is completed, very carefully remove the masks around the light blue so that a paint ridge will not form between the colors. When all of the colors are dry, apply a clear gloss coat to the aircraft to provide a smooth surface for the decals.
Follow the instructions closely for the decal placement. A few of the markings will require patience, especially the ones that fit around the cowlings. Work slowly and use a damp cotton swab to blot away water once you have the decal properly positioned.
The decals on the fuselage are complicated and will take extra care to apply. A little decal-setting solution should be a help in this part of the job.
Assemble and paint the main and nose landing gear and cement them into position. Note that the tires have tiny raised “Goodyear” lettering on them.
Dirty Dora was a lady with a history. This kit is the only one available today that accurately depicts this venerable Mitchell as she fought in 1944.