
Kurt Tank’s Focke-Wulf Ta-152H is produced in 1/72nd and 1/48th scales by DML (Dragon Models Limited) of Hong Kong. There is little difference between the offerings, but note that these kits were engineered many years ago, and the fit of parts is not up to today’s standards.
The instruction sheet calls for starting with construction of the Junkers Jumo 213E engine. Displaying the engine requires cutting open the cowling to expose the power plant, however, which weakens the ill-fitting cowl and results in serious fit problems. I opted to go directly to the cockpit, where the instructions call for it to be painted “Feld Grau,” a light gray close to RLM-02. Other sources indicate that the cockpit should be “Dunkelgrau,” RLM-66. The instrument panel should be painted flat black, with a few dots of gray to simulate the gauges. Finish the cockpit with a set of paper belts for the pilot’s seat. Glue the completed cockpit into one side of the fuselage and set aside to dry.
The upper wing section-to-fuselage joint is very poor. Dry-fit the parts to make sure they fit reasonably well before applying cement. This joint resisted closing and required several coats of filler and sanding before it yielded an acceptable fit.
While the top section of the wing is setting up with the fuselage, glue the spar that forms the rear portion of the wheel well box in the bottom wing. The mounts for the 20mm cannons located in each of the wing roots can also be glued into place at this time.
Cement the fuselage parts together, then glue the top and bottom wing sections to the airframe along with the horizontal stabilizers. Next check over your construction, filling and sanding where necessary. Paint the inside of the main gear doors and the landing gear legs RLM-02 and the tires “tire black” with gloss black hubs.
The large paddle-shaped propeller blades should be painted “Schwarzgrün,” black-green or RLM-70, and set aside to dry for later assembly. Our model’s paint scheme has a light-gray spiral around the spinner. You can create this by masking the corkscrew shape around the spinner with thin strips of tape after it has been painted dark green. Once all the seams have been filled and sanded, apply a light coat of Tamiya’s surface primer to highlight any construction flaws.
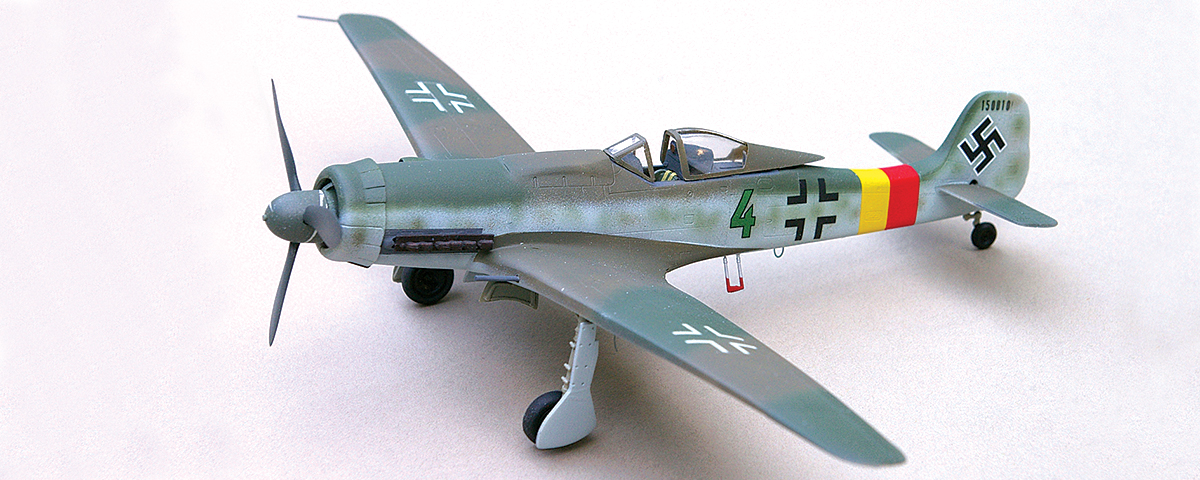
The kit’s decal sheet provides markings for a number of late-war Ta-152Hs. For reference, you can see a profile of a long-winged Ta-152—flown by Flight Sgt. Walter Loos, from Stab/JG.301, based at Neustadt-Glewe, Germany, in April 1945—on pages 120 and 121 of Luftwaffe Fighter Aircraft in Profile, by Claes Sundin and Christer Bergstrom. The wings and top sections of that aircraft’s fuselage were painted in a soft-edge camouflage scheme of late-war shades of “Braunviolet,” RLM-81, and “Dunkelgrün,” RLM-82. The undersides and a portion of the fuselage sides up to the canopy and vertical tail should be “Hellgrün,” RLM-83, splotched with the dark green and brown-violet. Home defense fuselage bands of red and yellow brighten the drab camouflage.
Spray a light coat of Testors glosscoat over the entire model to provide a smooth surface for the decals. All the markings are included in the kit except the Nazi swastika, which I took from my spares box. I pieced together the Werknummer found on the tail, 150010, from other aircraft markings in the box. According to authors Sundin and Bergstrom, this Ta-152H is the only one known to survive the war, but the work number on the profile cannot be confirmed.
Finish your model by attaching the landing gear legs and doors, the DF radio loop and the prop and spinner. Before gluing the windscreen and canopy in place, spray a coat of Testors dullcoat to seal the markings.