Models of the Lockheed U-2 spy plane are as scarce as available details of the actual aircraft. In 1962 Hawk Model Company produced a 1/48th-scale U-2 kit that was crude by today’s standards. During the 1970s Testors acquired the Hawk molds and updated the kit, adding extra parts and new markings. In 1980 Airfix of England issued a 1/72nd-scale kit that could be built as an A, C or D model. All those kits are rare now, however, and can generally be found only at modelers’ swap meets or online, for high prices.
The Testors U-2 for this build is from my stash of kits deemed “maybe I’ll build it someday.” Since the model has no cockpit, I started construction by scavenging parts from kits that had ended up in the spares box. The cockpit tub came from a Revell 1/48th-scale F-104C, while the unique ejection seat is a modified Martin Baker 2H, with scratch-built additions from plastic strips. On P. 12 of the Squadron/Signal publication U-2 Spyplane in Action, an ejection seat is shown with black or dark gray frames. The seat cushions were most likely olive drab, FS-34087. Note that Cutting Edge models released a cockpit detail set some years ago, but it’s no longer available.
You’ll have to look to the Internet for interior colors. Indications are that the cockpit should be painted dark gull gray, FS-36270, with flat black side consoles. Next paint the instrument panel semi-gloss black, detailing it using dots of white, red and yellow to replicate dials and switches.
Fitting the new cockpit will take time and patience. When it’s finally installed, close the fuselage pieces. Since this is an old kit, you’ll need to hold the parts together with tape until the glue dries. Once the fuselage is solidly together, attach the horizontal stabilizers. The wings in the kit I used were warped, and to coax them back into shape I immersed them in hot water and gently bent them straight. Major Mike Hua’s U-2 did not carry external fuel tanks, so fill the openings on the underside of the wings for the external tanks.
Attach the wings and hold them in position with tape until they have set solid. This kit is close to a half-century old, and the parts don’t fit well. Introduced when model kits were considered toys, it contains barely more than 40 pieces. Be prepared to fill and sand all the seams. You may need to fill in some joints several times to get a flawless fit. The raised panel lines, standard for the period, will have to be sanded smooth.
The Testors kit is molded in black plastic, not a suitable color on which to base an unpainted aluminum finish. Stuff some wet tissue into the cockpit to protect it from overspray, then apply Alclad II gray primer to seal the plastic and filler. When the primer is dry, wet sand your model and then polish it overall with extra-fine sand paper. When the surface is mirror smooth and without flaws, spray a coat of gloss light gray to serve as a base for the trio of Floquil metalizers: bright silver, old silver and platinum mist.
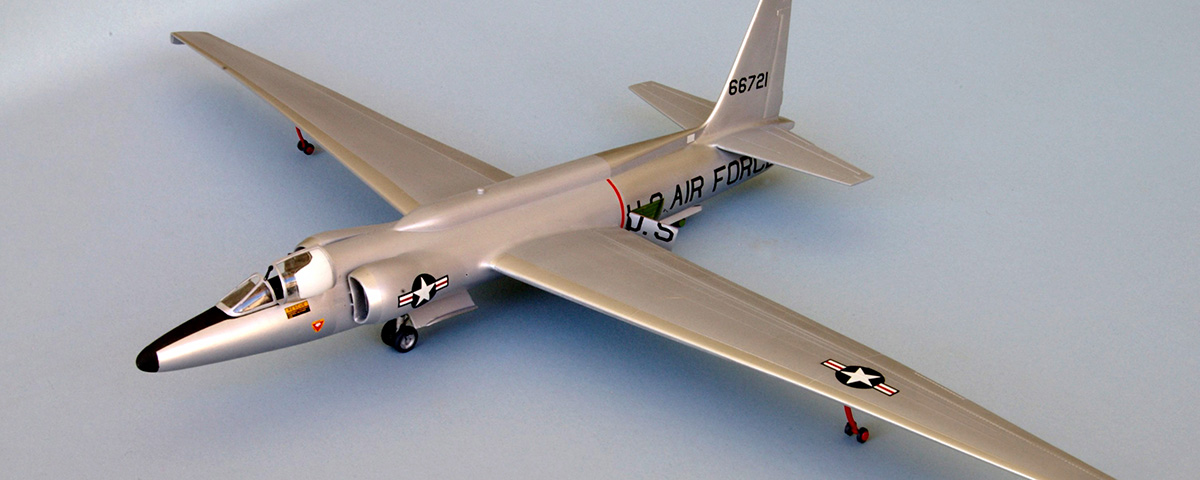
Major Hua was flying U-2 serial no. 56-6721 when he skidded off the runway at Cortez, Colo. After his emergency landing, Lockheed rebuilt 66721 into a two-seater, which was assigned to the Air Force Flight Test Center at Edwards Air Force Base in California.
The markings for our aircraft come from an out-of-production decal sheet from Cutting Edge Productions, CED- 48150. Finish the model by installing the canopy, and then painting the gear wells green zinc chromate and the gear legs silver with black tires. The outrigger “pogos” that fit under the wings should be insignia red, FS-31136, with black tires.
Originally published in the January 2015 issue of Aviation History. To subscribe, click here.